- Juanma's Blog/
- Posts/
- Deploying OpenStack with KVM and VMware NSX - Part 1: NSX overview and initial setup/
Deploying OpenStack with KVM and VMware NSX - Part 1: NSX overview and initial setup
Table of Contents
If you follow me on Twitter or Google+ probably have seen and increased number of tweets and posts about OpenStack, DevStack, KVM and other Linux related topics. It’s no secret that I am a *nix guy however it wasn’t until last year that I really discovered OpenStack. Oh yes I knew about it, have read a ton of articles and watched some videos in YouTube but I never had the opportunity to actually play with it until I sat on a Hands on Lab about OpenStack and vSphere during VMworld in Barcelona last October. After VMworld I started a personal project to learn as much as possible about OpenStack, using some labs with KVM and vSphere to try to achieve a decent level of proficiency. Finally this year I was able to ramp up with NSX and decided to build a new lab with OpenStack, KVM and NSX and document my progress here in my blog. So without further ado here it is my first series of posts about OpenStack and NSX.
During this series we will see how to deploy OpenStack with KVM as the underlying hypervisor and VMware NSX for the networking part. I intended to create a fairly comprehensive guide here for my personal reference and as a learning exercise. All posts of the series are based on my personal experience in a lab environment.
Lab components #
To illustrate the post I have created a lab with virtual machines running on VMware Fusion in my MacBook Pro, but you can use any virtualization software you want as long as it allows you to expose the virtualization extensions to the virtual machine, for the KVM compute node. We will need the following virtual machines
- Cloud controller node
- Nova compute node with KVM
- Neutron networking node
- GlusterFS storage node
- NSX Controller
- NSX Manager
- NSX Service Node
- NSX Gateway
I’ll provide the exact hardware config of each virtual machine in its own part. We will deploy OpenStack Havana using as reference one of the architectures described in OpenStack Havana installation guide.
You are probably asking yourself now why I’m using Havana when Icehouse was released just a few weeks ago? There are two reasons for this, first is that when I started to create my lab and decided to document my progress here Icehouse wasn’t out yet and after it was released I decided to stick with Havana because the NSX plugin for Neutron, OpenStack network module, has not been updated yet for Icehouse.
The software versions to be used are:
- OpenStack Havana
- CentOS 6.4 - For OpenStack nodes
- Fedora 20 - For GlusterFS storage node
- NSX for Multi-Hypervisor 4.1
I have another Fedora 20 virtual machine providing DNS and NTP services for the lab, I’m planning to add DHCP and OpenLDAP capabilities in the future.
NSX deployment overview #
The Network Views #
The first concept you need to understand in NSX are the network views. NSX defines two network views:
- Logical Network View
- Transport Network View
The Logical Network View is a representation of the network services and connectivity that a virtual machine “see” in the cloud, basically for the operating system running inside the VM the logical network view is the network that it is connected to. The Logical Network View is completely independent from the underlying physical network. It is made of the logical ports, switches and routers that interconnects the different virtual machines within a tenant and connect them to the outside physical network. In a cloud each tenant will have its own logical network view and would isolated from other tenants views.
The Transport Network View represents the physical devices that underly the logical networks. These devices or transport nodes, as they are referred, can be hypervisors and the network appliances interconnecting those hypervisors to the external physical network. Every one of these transport nodes must run an instance of Open vSwitch.
NSX Deployment Components #
An NSX deployment will be made out of the Control Plane and Data Plane. Additionally there is a Management Plane comprised by the NSX Manager, last one is not mandatory for an OpenStack deployment but it can be useful.
NSX Control Plane #
The Control Plane is made of the NSX Controller Cluster. This is an OpenFlow controller that manages all the Open vSwitch devices running on the transport nodes and a logical network manager that allow to build and maintain all the logical networks carried by the transport nodes. It provides consistency between logical network view and transport network view. Internally it has several roles to manage the different tasks it is responsible of.
- Transport node management: Maintains connections with the different OVS instances.
- Logical network management: Monitors when endhosts get connected and disconnected from OVS. Also implements logical connectivity and policies by configuring OVS forwarding states.
- Data persistence and replication: Stores data from OVS devices and NVP API to provides persistence across all nodes of the cluster in case of failure.
- API server: Handles HTTP requests from external elements.
The NSX Controller is an scalable out cluster running on x86 hardware, it supports a minimum of three nodes and a maximum of five. Single node clusters are not supported although for the lab I deployed a single-node one.
NSX Data Plane #
The Data Plane will be implemented by the previously referred transport nodes, this is OVS devices and NSX appliances, managed by the Controller Cluster.
Hypervisors: The compute nodes leveraging Open vSwitch to provide network connectivity for the virtual machines.
NSX Gateway/s: The NSX Gateways formed the Gateway Service that allows a logical network to be attached to a physical network not managed by NSX. The gateways can be L2 Gateway, expands L2 logical segment to include a physical one, and L3 Gateway that maps itself to physical router port.
NSX Service Node/s: The Service Nodes are OVS enabled appliances that provide extra processing capacity by offloading network packet processing from the hypervisor virtual switches. The type of operations managed by the service nodes are for example assisting with the packet replication during broadcast/multicast operations or unknown multicast flooding in overlay logical networks.
NSX Management Plane #
The NSX Management Plane is composed exclusively by the NSX Manager. Provides a different and more friendly way to interact with the NVP API, and configure the logical network components for example, through its web UI. In an OpenStack deployment there is need to use it, however it can be helpful for troubleshooting purposes.
NSX network appliances deployment #
For our lab purposes create four Ubuntu x64 virtual machines with 1vCPU, 1GB of RAM, 1 network interface (E1000) and 16GB of disk.
NSX Controller #
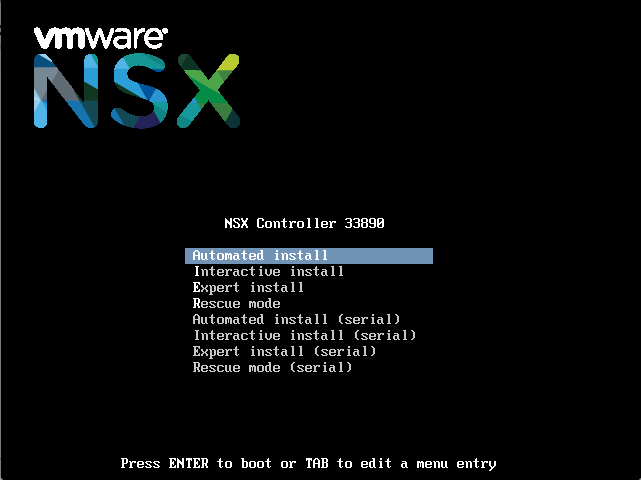
Power on the VM and on the boot screen select Automated Install.
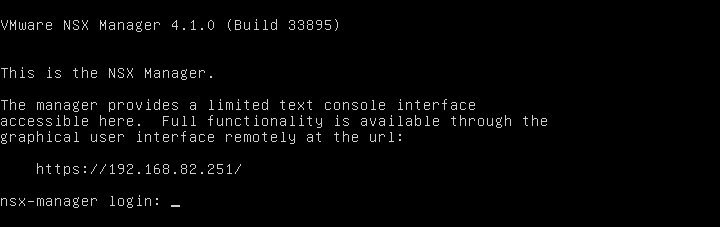
The installation will take several minutes to finish. When it’s finished you will see a prompt like this in the virtual machine console.

Login as admin user with password admin. In a normal deployment you will configure admin user password with set admin user password but for the lab is not needed.
Set the IP address for the controller node.
nsx-controller # set network interface breth0 static 192.168.82.45 255.255.255.0
Setting IP for interface breth0...
Clearing DNS configuration...
nsx-controller #
nsx-controller # show network interface breth0
IP config: static
Address: 192.168.82.45
Netmask: 255.255.255.0
Broadcast: 192.168.82.255
MTU: 1500
MAC: 00:0c:29:92:ce:0c
Admin-Status: UP
Link-Status: UP
SNMP: disabled
nsx-controller #
Configure the hostname.
nsx-controller # set hostname nsxc
nsxc #
Next configure the default route.
nsxc # add network route 0.0.0.0 0.0.0.0 192.168.82.2
nsxc #
nsxc # show network route
Prefix/Mask         Gateway         Metric  MTU     Iface
0.0.0.0/0           192.168.82.2    0       intf    breth0
192.168.82.0/24     0.0.0.0         0       intf    breth0
nsxc #
Set the address of the DNS and NTP servers.
nsxc # add network dns-server 192.168.82.110
nsxc #
nsxc # add network ntp-server 192.168.82.110
 * Stopping NTP server ntpd                                                                                                                                                          [ OK ]
Synchronizing with NTP servers. This may take a few seconds...
27 Apr 21:03:49 ntpdate[3755]: step time server 192.168.82.110 offset -7199.735794 sec
 * Starting NTP server ntpd                                                                                                                                                          [ OK ]
nsxc #
Set the management address of the control cluster.
set control-cluster management-address 192.168.82.45
Configure the IP address to be used for communication with the different transport nodes.
set control-cluster role switch_manager listen-ip 192.168.82.45
Configure the IP address to handle NVP API requests.
set control-cluster role api_provider listen-ip 192.168.82.45
Finally join the cluster, since this the first node of the cluster the IP has to be its own one.
nsxc # join control-cluster 192.168.82.45
Clearing controller state and restarting
Stopping nicira-nvp-controller: [Done]
Clearing nicira-nvp-controller's state: OK
Starting nicira-nvp-controller: CLI revert file already exists
mapping eth0 -> bridged-pif
ssh stop/waiting
ssh start/running, process 5009
mapping breth0 -> eth0
mapping breth0 -> eth0
ssh stop/waiting
ssh start/running, process 5158
Setting core limit to unlimited
Setting file descriptor limit to 100000
 nicira-nvp-controller [OK]
** Watching control-cluster history; ctrl-c to exit **
===================================
Host nsx-controller
Node ffac511c-12b3-4dd0-baa7-632df4860521 (192.168.82.248)
  04/27 22:40:42: Initializing data contact with cluster
  04/27 22:40:49: Fetching initial configuration data
  04/27 22:40:51: Join complete
nsxc #
You can check at any moment the status of the node in the cluster with the show control-cluster status command.
nsxc # show control-cluster status
Type                Status                                       Since
--------------------------------------------------------------------------------
Join status:        Join complete                                04/27 22:40:51
Majority status:    Disconnected from cluster majority           04/27 22:53:44
Restart status:     This controller can be safely restarted      04/27 21:23:29
Cluster ID:         7837a89a-22f3-4c8c-8bef-c100886374e9
Node UUID:          7837a89a-22f3-4c8c-8bef-c100886374e9

Role                Configured status   Active status
--------------------------------------------------------------------------------
api_provider        enabled             activated
persistence_server  enabled             activated
switch_manager      enabled             activated
logical_manager     enabled             activated
directory_server    disabled            disabled
nsxc #
In a standard NSX deployment now would the moment to add more nodes to the cluster using again the join control-cluster command with the same IP address.
NSX Gateway #
Proceed with the Automated Install as in the Controller node. When the installation is done login as admin user.
Set IP address.
set network interface breth0 static 192.168.82.47 255.255.255.0
Set hostname.
set hostname nsxg
Configure the rest of the network parameters as in the Controller node and proceed to the gateway specific configuration.
nsxg # add switch manager 192.168.82.45
Waiting for the manager CA certificate to synchronize...
Manager CA certificate synchronized
nsxg #
NSX Service Node #
Again launch the Automated Install and let it finish. As admin user configure the IP address…
set network interface breth0 static 192.168.82.46 255.255.255.0
…and the hostname.
set hostname nsxsn
Finish the network configuration as in the Gateway and the Controller and configure the Service Node to be aware of the Controller Cluster
add switch manager 192.168.82.45
The above command will return an error like this.
Manager CA certificate failed to synchronize.  Verify
the manager is running on the specified IP address.
It’s normal since the Transport Node will not be able to connect to the NSX Controller Cluster until the cluster has been informed, either via NVP API or NSX Manager interface, about the existence of the Transport Node.
NSX Manager #
Access the NSX Manager console, you have to see a similar screen.
Set the IP and the hostname and configure the default route, DNS and NTP server.
set network interface breth0 static 192.168.82.47 255.255.255.0
set hostname nsxm
add network route 0.0.0.0 0.0.0.0 192.168.82.2
add network dns-server 192.168.82.110
add network ntp-server 192.168.82.110
With this we have completed the installation and initial configuration of our four NSX appliances. In a real world deployment we should have to add at least two more NSX controller nodes to our cluster and maybe one or more gateways in order to setup L2 and L3 Gateway Services. The number of Service Nodes will depend on the expected load of our cloud.
Connect the NSX Manager to the Controller Cluster #
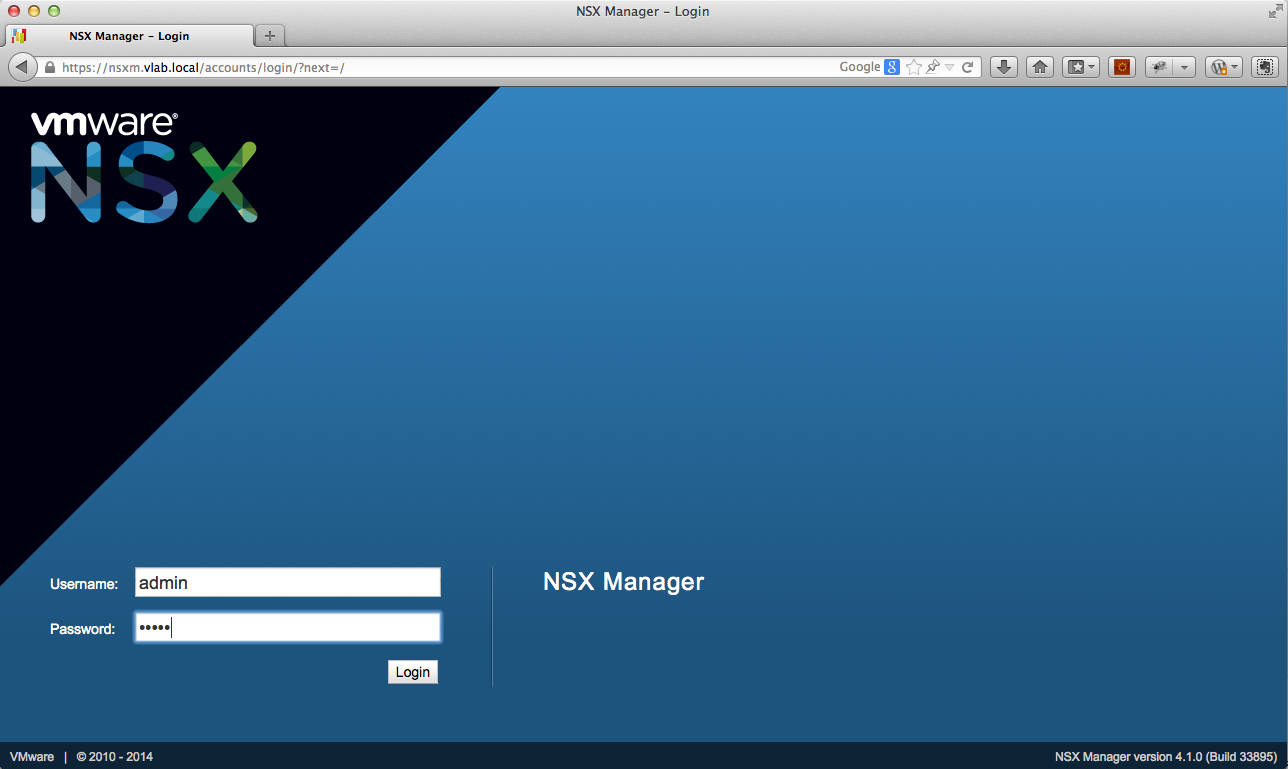
Our next step is to connect our newly crested NSX Controller Cluster with NSX Manager. Access NSX Manager web interface and login as admin user.
After the login the Manager will indicate that there is no Controller Cluster added.
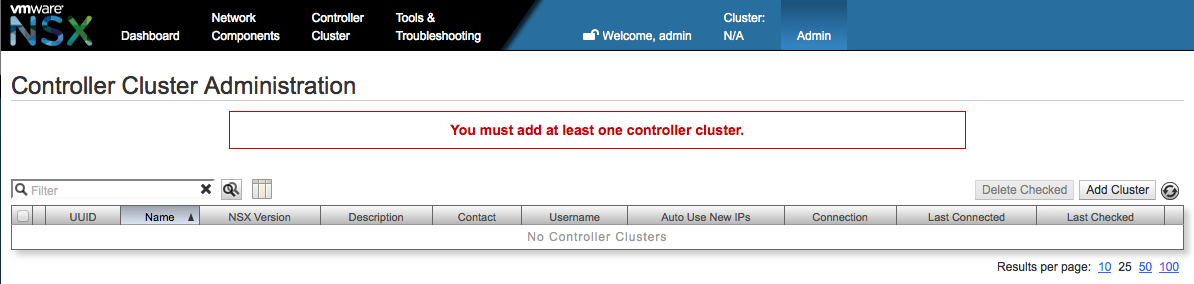
Click the Add Cluster button and enter the data for the NSX Controller Cluster.
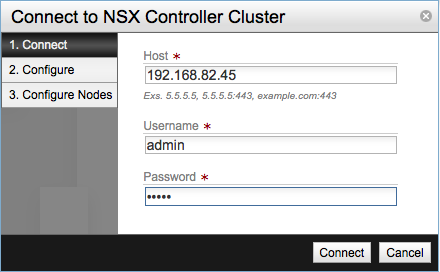
If the connection is successful the a new screen will show up.
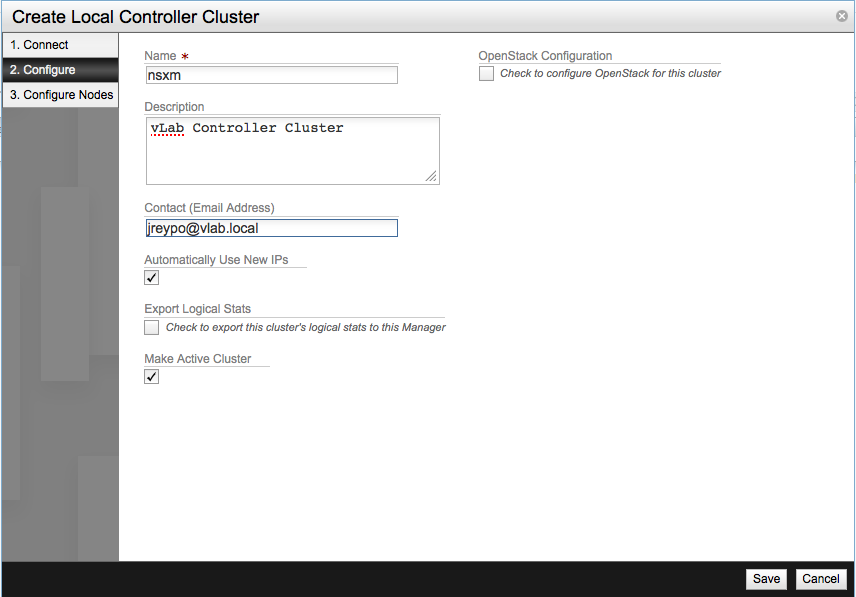
Provide the following information:
- Name of the cluster
- Contact email address of the administrator
- Automatically Use New IPs - This setting, checked by default, will add all the IP address of the members form this cluster as eligible to receive API call from the NSX Manager.
- Make Active Cluster
In the next screen enter the IP address of your syslog server or click Use This NSX Manager to use the NSX Manager as syslog server.
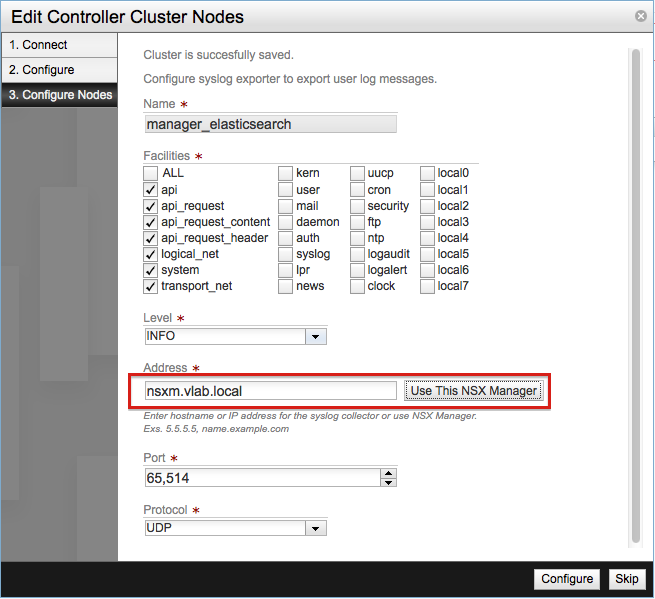
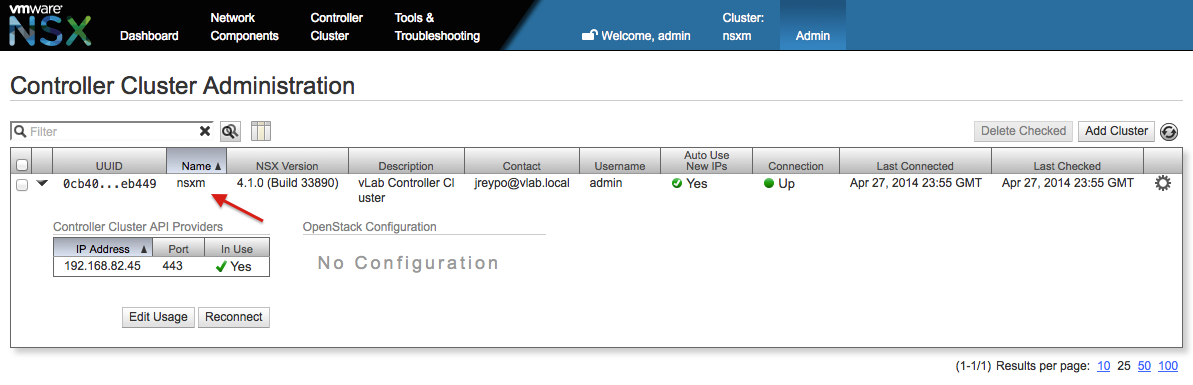
After clicking in Configure the Manager will finish the configuration of the Controller Cluster and will go back the previous screen where we can see the new cluster we have just added to the Manager.
In the next post we will see how to configure NSX Transport and Logical network elements. As always comments are welcome.
Juanma.