
HP Virtual Connect Domain Setup – Part 4: Server Profiles
This is the fourth and last part of this series of posts about Virtual Connect, the first three were:
- HP Virtual Connect Domain Setup - Part 1: Domain Setup Wizard
- HP Virtual Connect Domain Setup - Part 2: Networking Setup
- HP Virtual Connect Domain Setup - Part 3: Storage Setup
In this final post I will discuss Server Profiles, what are they and how to create. As in the rest of the series I’m using Virtual Connect 3.10.
So, what is a Server Profile? We can define a Virtual Connect server profile as a logical grouping of attributes related to server connectivity that can be assigned to a server blade. You can see it as the connectivity personality of the server.
The server profile includes:
- MAC address.
- Pre-boot Execution Environment (PXE) enablement.
- Network connection setting for each NIC port and WWN.
- SAN fabric connection.
- SAN boot parameter setting for each Fibre Channel HBA port.
Once the server profile is created you can apply it to any server within the VC Domain. There is a maximum of 64 fully populated VC Server Profiles in a VC Domain.
As we saw in the network and storage posts the VCM can be configured so that blade servers use their factory-default MACs/WWNs and serial numbers or Virtual Connect provided and administered ranges of MACs and WWNs. These MACs and WWNs will override the default MAC and WWN values when a server profile is applied to the server and appear to pre-boot environments and host operating systems as the hardware addresses.
When a server profile is assigned to a Device Bay the Virtual Connect Manager securely connects to the blade in the bay and configures the NIC ports with profile provided MAC addresses and PXE settings and the FC HBA ports with the appropriate WWNs and SAN boot settings. Additionally the VCM automatically connects the server to the specified networks and SAN fabrics.
This server profile can then be copied or reassigned to another server as needed without interrupting the server connectivity to the network and SAN.
Once a blade server has been assigned a server profile and as long as it remains in the same device it does not require further VC Manager configuration during server or enclosure power cycle. They boot and access the network and fabric as long as soon as the server and interconnect modules are ready. If a server is inserted into a device bay that has already been assigned a server profile VCM automatically updates the configuration of that server before it is allowed to power on and connect to the network.
If a blade server is moved from a Virtual Connect managed enclosure to a non VC managed one all the ports automatically returns to their original factory values and settings in order to prevent duplicate MAC and WWNs within the datacenter because a blade server redeployment.
In addition to the above information the following points must be considered when working with server profiles:
- Blade server and card firmware revision must be at a revision that supports Virtual Connect profile assignment.
- Before creating the first server profile select whether to use Virtual Connect administered MAC and WWN ranges or the local factory default values.
- After an enclosure is imported into a VC Domain the blades will remain isolated from networks and SAN fabrics until a server profile is assigned.
- When Virtual Connect administered MACs and/or WWNs or when changing Fibre Channel boot parameters the servers must be powered off in order to receive or relinquish a server profile.
- Fibre Channel SAN connections will display in the profile server screen only if the VC-FC module in the enclosure managed by Virtual Connect. If there is no VC-FC module the FC option wouldn’t appear in the server profile screen until a module has been added.
- Some server profile SAN boor settings, like the controller boot order, are applied only after the server has been booted with the final mezzanine card configuration.
- If PXE or SAN boot settings are made outside of Virtual Connect, the settings defined by the server profile will be restored after the blade server completes the next boot cycle.
If you have worked in the past with the 2.x Virtual Connect Manager revisions I’m sure that you will remember the Server Profile Wizard. That wizard has been removed from the 3.x revisions of VCM.

To start the server profile creation you have now to go to the Virtual Connect Home and in the Server area click on Define Server Profile.

In the Define Server Profile screen first enter the name of the profile, ESX01 in the example, and choose if you want to use factory default MAC and WWN or the VC-predefined.

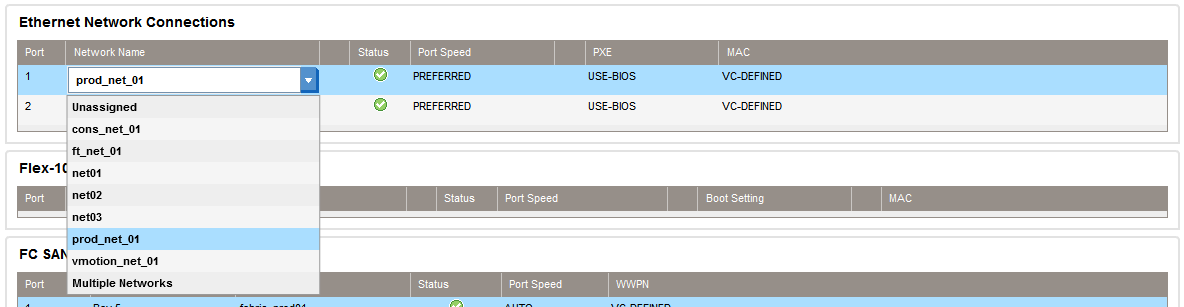
Then move to Ethernet Network Connections. Here you can select the networks to assign to the ports, the port speed between AUTO, PREFERRED and CUSTOM and the PXE settings (ENABLED, DISABLED or USE-BIOS). By default there are only two connections created, to add more connections just right-click the area and choose Add connection.
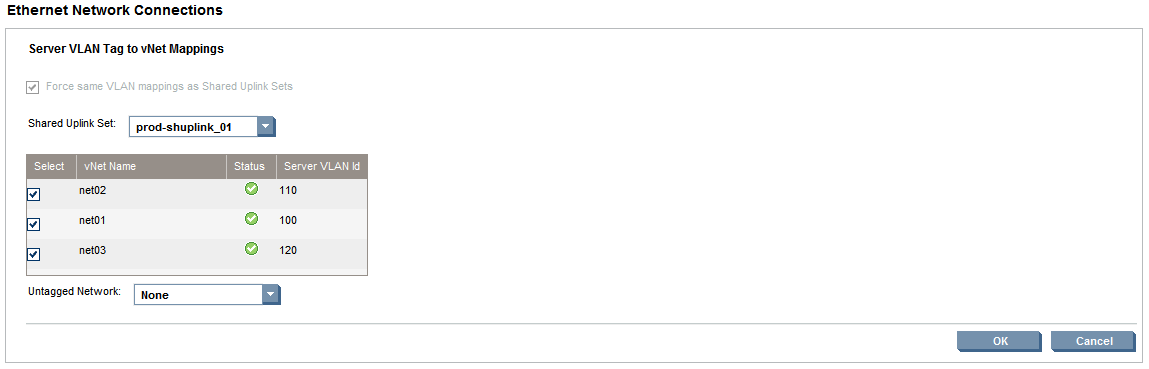
In Network Name if you choose Multiple Networks a new icon will appear that will allow you to edit this connection type. Click and a new section will show up, this section allows to select the Shared Uplink Set and the networks. There is also a checkbox to set if you want to force the same VLAN mappings as the Shared Uplink Set to the different networks.
The next area is the FC SAN Connections. Assign the modules in the bays to the correspondent fabric and set the port speed.

Also in this section you can define the SAN boot parameters, click on the checkbox, the page will dim and a pop-up will appear.There you can configure each FC connection as PRIMARY, SECONDARY, DISABLED or USE-BIOS and set the Target Port Name and the LUN.

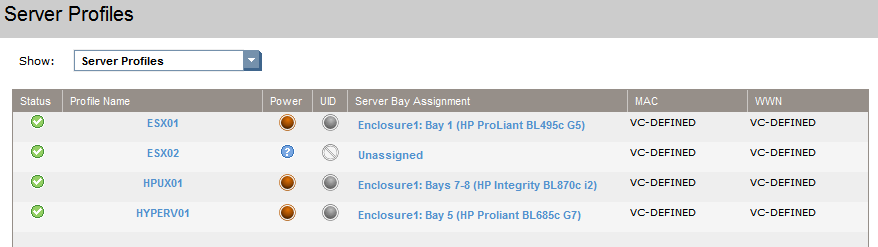
Finally we can assign the profile to a server bay.

Click Apply and the new server profile will be done. You can always edit the existing server profiles from the Server Profiles screen in the VC administration interface.
And this is the end. This series is done, if you have follow the correct steps outlined in the four posts you will have a fully operation Virtual Connect Domain. Of course there are a some topics I’d like to write about like iSCSI, FlexFabric and the VCM command line but I believe it’s better to do it in their own dedicated posts, stay tuned.
Juanma.
Comments