Kubernetes 1.8 with RBAC enabled and Azure Active Directory integration
Role-based access control, or RBAC, has been around in Kubernetes for some time however it wasn’t until the recently released 1.8 version that finally reached the stable status. With that in mind and due to some customer requirements around RBAC I decided to try the Kubernetes integration with Azure Active Directory, in this post I’d like to document the process.
Before going on with the post I have to say that this post would have been impossible without the help of my friend and colleague Alessandro Vozza, he provided many invaluable tips and sources of information.
Prerequisites
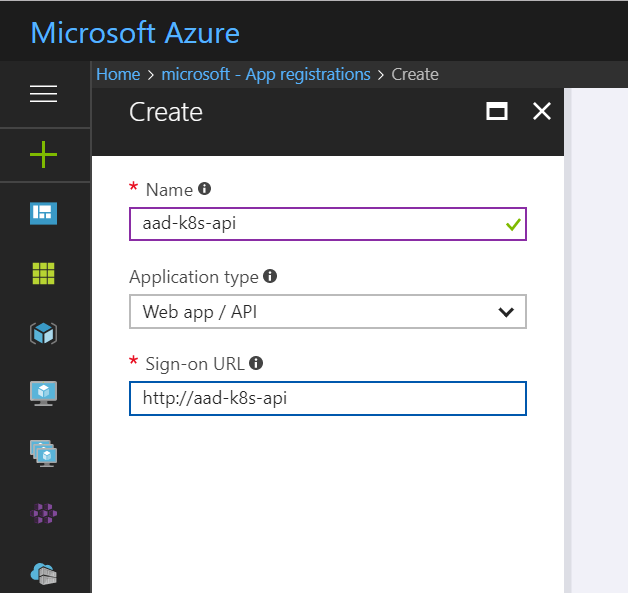
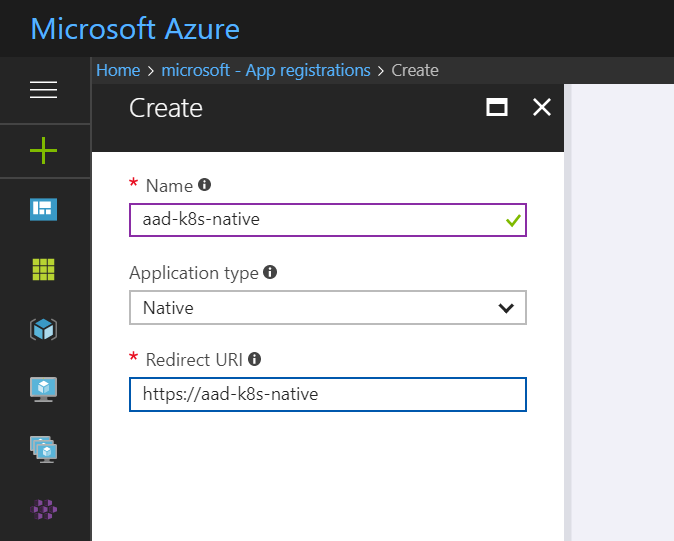
Before deploying the new cluster and for the integration to work we will need to create two Azure Active Directory App Registrations, one as Web App/API and another as Native type. The first one will represent the Server App and the Second the Client App.
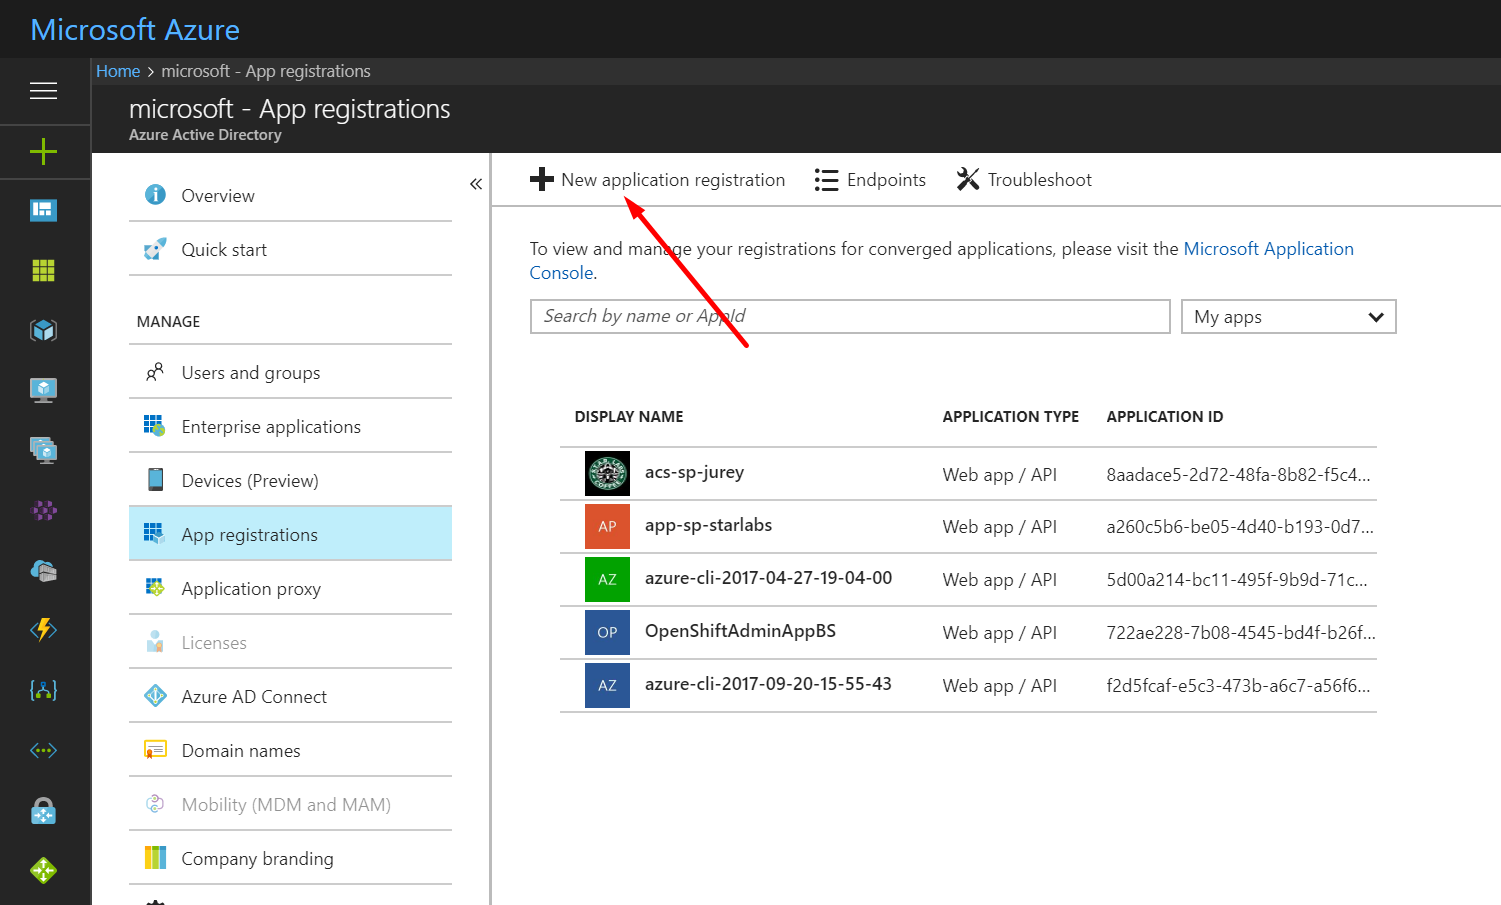
To create the apps in the Azure Portal go to Azure Active Directory -> App registrations and click on New application registration.
For the Server App:
For the Client App:
Once both apps are created we will need to grant access permissions to the Server Application from the Client Application. On the Azure Portal access Azure Active Directory -> App registrations, select the Client Application and got to Settings -> Required permissions.
Click Add, select the Server Application in Select an API section and enable the access permissions.
Deploy the cluster
To deploy our Kubernetes 1.8 cluster we will use ACS-Engine, this is the core component of Azure Container Service and will allow us to deploy a customized Kubernetes cluster on Azure. First create the cluster definition, you can use kubernetes.json example file from acs-engine repo as starting point. The file should look similar to the following one.
{
  "apiVersion": "vlabs",
  "properties": {
    "orchestratorProfile": {
      "orchestratorType": "Kubernetes",
      "orchestratorRelease": "1.8",
      "kubernetesConfig": {
        "enableRbac": true
      }
    },
    "aadProfile": {
      "serverAppID": "Client_App_ID",
      "clientAppID": "Server_App_ID",
      "tenantID": "Tenant_ID"
    },
    "masterProfile": {
      "count": 1,
      "dnsPrefix": "aad-k8s-18",
      "vmSize": "Standard_DS2_v2"
    },
    "agentPoolProfiles": [
      {
        "name": "agentpool1",
        "count": 3,
        "vmSize": "Standard_DS2_v2",
        "storageProfile": "ManagedDisks",
        "availabilityProfile": "AvailabilitySet"
      }
    ],
    "linuxProfile": {
      "adminUsername": "azuser",
      "ssh": {
        "publicKeys": [
          {
            "keyData": "YOUR_SSH_KEY"
          }
        ]
      }
    },
    "servicePrincipalProfile": {
      "clientId": "SERVICE_PRINCIPAL_ID",
      "secret": "SERVICE_PRINCIPAL_SECRET"
      }
    }
}
With the cluster definition created use acs-engine command to generate the ARM template files for the cluster.
$ acs-engine generate --api-model k8s-18-aad.json
INFO[0000] Generating assets into _output/aad-k8s-18...
$
Create a new resource group and deploy the cluster with azure-cli passing the template JSON files from the _output directory as parameters for the az group deployment create command.
$ az group create -n k8s-aad-demo -l westeurope
Location    Name
----------  ------------
westeurope  k8s-aad-demo
$ az group deployment create --name k8s-aad -g k8s-aad-demo --template-file _output/aad-k8s-18/azuredeploy.json --parameters _output/aad-k8s-18/azuredeploy.parameters.json --verbose
When the deployment is finished from the master copy the configuration from ~/.kube/config into your own kubectl config and test the connection.
$ kubectl get node -o wide
NAME                        STATUS    AGE       VERSION   EXTERNAL-IP   OS-IMAGE                      KERNEL-VERSION
k8s-agentpool1-73809577-0   Ready     1d        v1.8.0    <none>        Debian GNU/Linux 8 (jessie)   4.4.0-97-generic
k8s-agentpool1-73809577-1   Ready     1d        v1.8.0    <none>        Debian GNU/Linux 8 (jessie)   4.4.0-97-generic
k8s-agentpool1-73809577-2   Ready     1d        v1.8.0    <none>        Debian GNU/Linux 8 (jessie)   4.4.0-97-generic
k8s-master-73809577-0       Ready     1d        v1.8.0    <none>        Debian GNU/Linux 8 (jessie)   4.4.0-97-generic
Configure AAD integration
With our new Kubernetes 1.8 cluster deployed with RBAC enabled our next step will be to configure the integration for the users, unfortunately for now this has to be done on a user by user fashion since I wasn’t able to make the process work for Active Directory groups.
Using kubectl create a new clusterrolebinding for the user, I am using a very simple example and giving my user on the Microsoft directory cluster-admin privileges.
$ kubectl create clusterrolebinding aad-default-cluster-admin-binding --clusterrole=cluster-admin --user=https://sts.windows.net/<YOUR_TENANT_ID>/#<YOUR_USER_ID>
clusterrolebinding "aad-default-cluster-admin-binding" created
Set KUBECONFIG varible to use the configuration generated by acs-engine for the Azure region the cluster was deployed on.
export KUBECONFIG=`pwd`/_output/aad-k8s-18/kubeconfig/kubeconfig.westeurope.json
Execute any kubectl command, you will be prompted with a message to sign in with a Microsoft account using a web browser, this message is the same as when you do an az login.
$ kubectl get nodes
To sign in, use a web browser to open the page https://aka.ms/devicelogin and enter the code DCLNEUVK9 to authenticate.
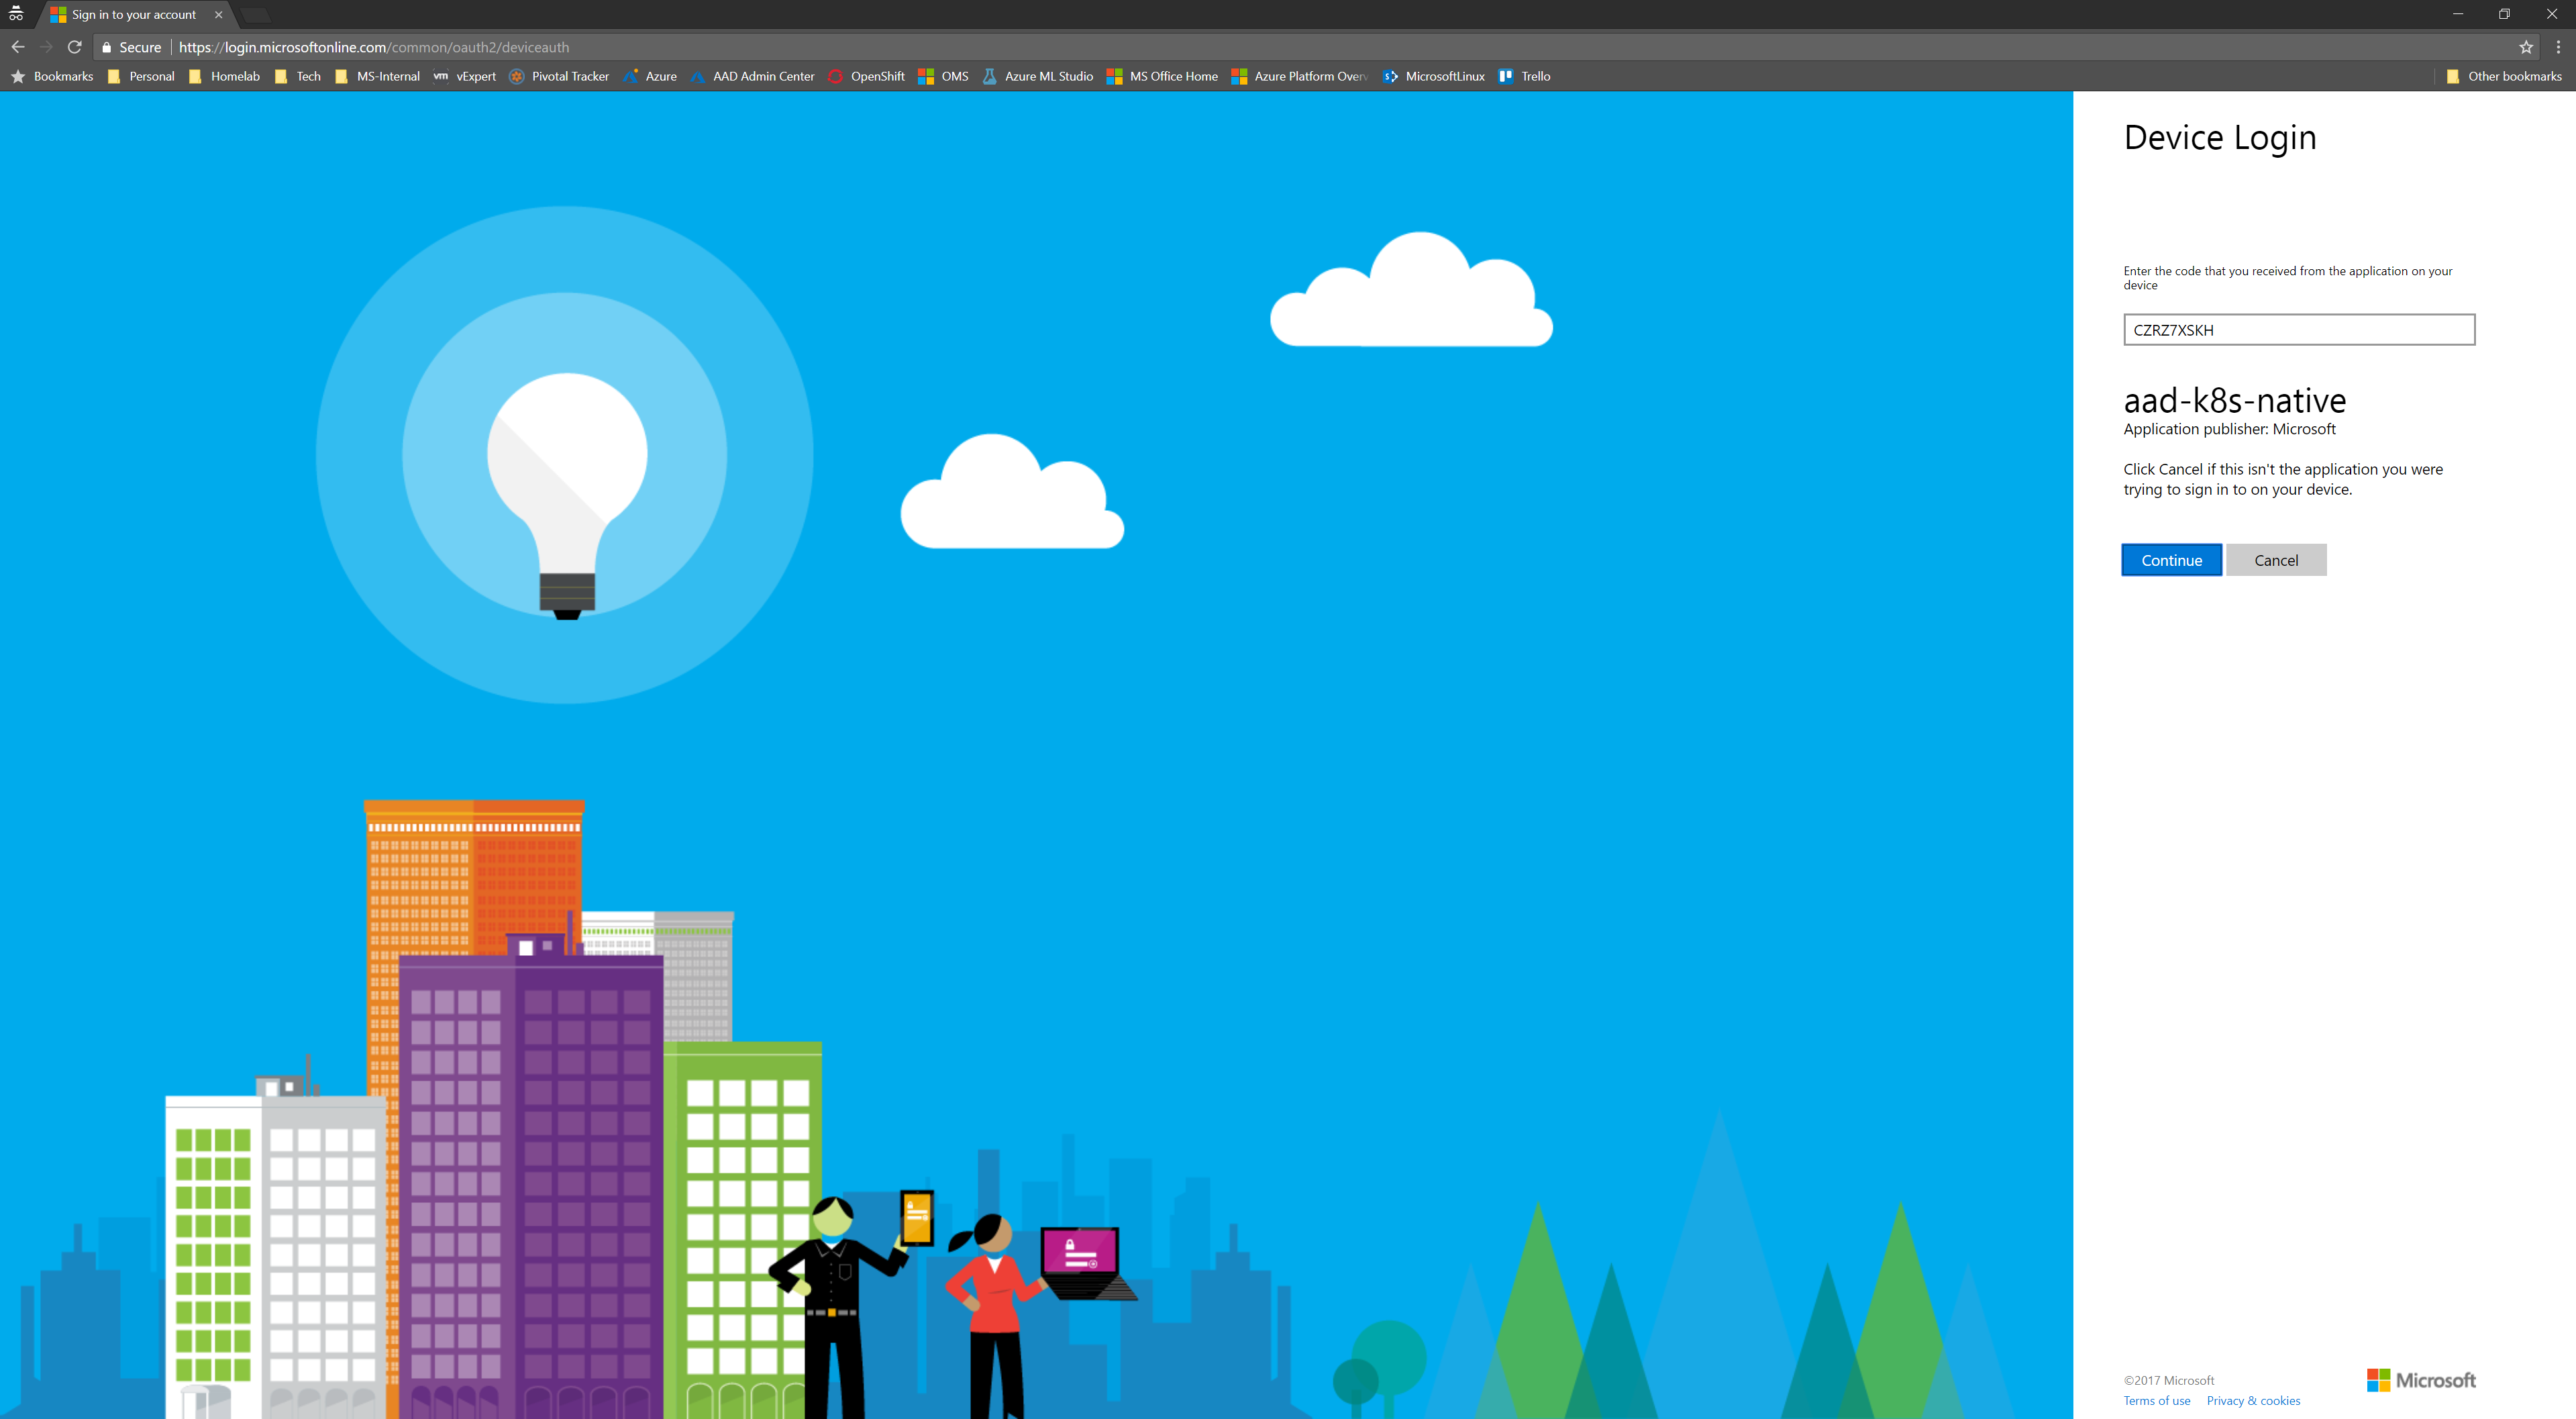
Open a browser access the https://aks.ms/devicelogin URL, enter the code and login with the account configured in the cluster role.
If the authentication is valid and the permissions and clusterrolebinding have been properly created the command will complete.
$ kubectl get nodes
To sign in, use a web browser to open the page https://aka.ms/devicelogin and enter the code CZRZ7XSKH to authenticate.
NAME                        STATUS    AGE       VERSION
k8s-agentpool1-73809577-0   Ready     14d       v1.8.0
k8s-agentpool1-73809577-1   Ready     14d       v1.8.0
k8s-agentpool1-73809577-2   Ready     14d       v1.8.0
k8s-master-73809577-0       Ready     14d       v1.8.0
You can retrieve kubectl configuration to verify the values.
$ kubectl config view
apiVersion: v1
clusters:
- cluster:
    certificate-authority-data: REDACTED
    server: https://aad-k8s-18.westeurope.cloudapp.azure.com
  name: aad-k8s-18
contexts:
- context:
    cluster: aad-k8s-18
    user: aad-k8s-18-admin
  name: aad-k8s-18
current-context: aad-k8s-18
kind: Config
preferences: {}
users:
- name: aad-k8s-18-admin
  user:
    auth-provider:
      config:
        access-token: <REDACTED>
        apiserver-id: <API_SERVER_ID>
        client-id: <CLIENT_SERVER_ID>
        expires-in: "3599"
        expires-on: "1508326831"
        refresh-token: <REDACTED>
        tenant-id: <TENANT_ID>
      name: azure
With this the integration is done. The logical next step would be to start digging into Kubernetes RBAC API documentation and create less privileged roles more suitable for a real deployment. Also I will continue to investigate the possibility of using Active Directory groups instead of just users since that option is much more efficient in a real Kubernetes installation.
As always courteous comments are welcome.
–Juanma


Comments