Kubernetes on Azure with Azure Container Service
Table of Contents
Have to admit that because months have passed since the DC/OS post I almost dropped this article, since then ACS documentation around Kubernetes got a huge improvement and also some articles about K8S and ACS have been published by other bloggers. However in the end I decided to finish and publish it in order to give consistency and coherence to my ACS series, specially since I will get into more Kubernetes related topics in future articles. So without further ado lets deploy and explore Kubernetes on Azure Container Service.
Cluster Deployment #
As with everything in Azure we need a resource group, it is the basic construct for any Azure deployment based on the ARM model and it will act as a boundary and logic container for all the resources that will form our Kubernetes cluster. You can use an existing one or you can create a new one, in our example we will take the second path.
$ az group create --name acs-k8s-3 --location westeurope
Location    Name
----------  ---------
westeurope  acs-k8s-3
Now we can create our cluster. To spin up your Kubernetes cluster you can of use the Azure Portal but I prefer to use Azure CLI 2.0. We will need a pair of SSH keys and a Service Principal, I already have them created but if you omit the --service-principal option and add the --generate-ssh-keys during the az acs create operation it will generate both for you.
az acs create -g acs-k8s-3 -n k8s-cl3 --orchestrator-type kubernetes --service-principal 11111111-1111-1111-1111-111111111111 --client-secret=xxxxxxxxx -d k8s-cl3 --admin-username azuser --verbose
I choose the defaults for Master and Agent count, one and three respectively, and my default ssh key from .ssh/id_rsa.pub.
Exploring the cluster #
Lets explore the cluster like we did with our DC/OS one.
$ az vm list -d -g acs-k8s-3
Name                   ResourceGroup    PowerState    Location
---------------------  ---------------  ------------  ----------
k8s-agent-C188E3DA-0   acs-k8s-3        VM running    westeurope
k8s-agent-C188E3DA-1   acs-k8s-3        VM running    westeurope
k8s-agent-C188E3DA-2   acs-k8s-3        VM running    westeurope
k8s-master-C188E3DA-0  acs-k8s-3        VM running    westeurope
The first noticeable difference with DC/OS is the lack fo VM Scale Sets. Why you maybe asking since Azure VMSS brings a lot benefits around scaling the cluster, the problem is that VMSS does not support attached disks and due to that persistent volumes in Kubernetes would not work with VMSS. The lack of VMSS brings a couple of issues like the ina also there is no Application Gateway for ingress traffic, another neat feature from VMSS, but to solve this we can use an NGINX ingress controller, I’ll get to this in more detail later in a future post.
Our ACS Kubernetes deployment includes:
- Master instance(s).
- Node instances - Unlike DC/OS in Kubernetes there is no concept of public and private agents.
- Storage
- Network
- Load balancers
- Public IP address for the master(s)
We can list all the resources using Azure CLI.
$ az resource list -g acs-k8s-3
Name                                                             ResourceGroup    Location    Type                                          Status
---------------------------------------------------------------  ---------------  ----------  --------------------------------------------  --------
agent-availabilitySet-C188E3DA                                   acs-k8s-3        westeurope  Microsoft.Compute/availabilitySets
master-availabilityset-C188E3DA                                  acs-k8s-3        westeurope  Microsoft.Compute/availabilitySets
k8s-master-C188E3DA-0-etcddisk                                   ACS-K8S-3        westeurope  Microsoft.Compute/disks
k8s-master-C188E3DA-0_OsDisk_1_44592cc1412f4efc9bd334b266fb26b3  ACS-K8S-3        westeurope  Microsoft.Compute/disks
k8s-agent-C188E3DA-0                                             acs-k8s-3        westeurope  Microsoft.Compute/virtualMachines
k8s-agent-C188E3DA-0/cse0                                        acs-k8s-3        westeurope  Microsoft.Compute/virtualMachines/extensions
k8s-agent-C188E3DA-1                                             acs-k8s-3        westeurope  Microsoft.Compute/virtualMachines
k8s-agent-C188E3DA-1/cse1                                        acs-k8s-3        westeurope  Microsoft.Compute/virtualMachines/extensions
k8s-agent-C188E3DA-2                                             acs-k8s-3        westeurope  Microsoft.Compute/virtualMachines
k8s-agent-C188E3DA-2/cse2                                        acs-k8s-3        westeurope  Microsoft.Compute/virtualMachines/extensions
k8s-master-C188E3DA-0                                            acs-k8s-3        westeurope  Microsoft.Compute/virtualMachines
k8s-master-C188E3DA-0/cse0                                       acs-k8s-3        westeurope  Microsoft.Compute/virtualMachines/extensions
k8s-cl3                                                          acs-k8s-3        westeurope  Microsoft.ContainerService/containerServices
k8s-master-internal-lb-C188E3DA                                  acs-k8s-3        westeurope  Microsoft.Network/loadBalancers
k8s-master-lb-C188E3DA                                           acs-k8s-3        westeurope  Microsoft.Network/loadBalancers
k8s-agent-C188E3DA-nic-0                                         acs-k8s-3        westeurope  Microsoft.Network/networkInterfaces
k8s-agent-C188E3DA-nic-1                                         acs-k8s-3        westeurope  Microsoft.Network/networkInterfaces
k8s-agent-C188E3DA-nic-2                                         acs-k8s-3        westeurope  Microsoft.Network/networkInterfaces
k8s-master-C188E3DA-nic-0                                        acs-k8s-3        westeurope  Microsoft.Network/networkInterfaces
k8s-master-C188E3DA-nsg                                          acs-k8s-3        westeurope  Microsoft.Network/networkSecurityGroups
k8s-master-ip-k8s-cl3-C188E3DA                                   acs-k8s-3        westeurope  Microsoft.Network/publicIPAddresses
k8s-master-C188E3DA-routetable                                   acs-k8s-3        westeurope  Microsoft.Network/routeTables
k8s-vnet-C188E3DA                                                acs-k8s-3        westeurope  Microsoft.Network/virtualNetworks
00ql5jhvvl5gdm6agnt0                                             acs-k8s-3        westeurope  Microsoft.Storage/storageAccounts
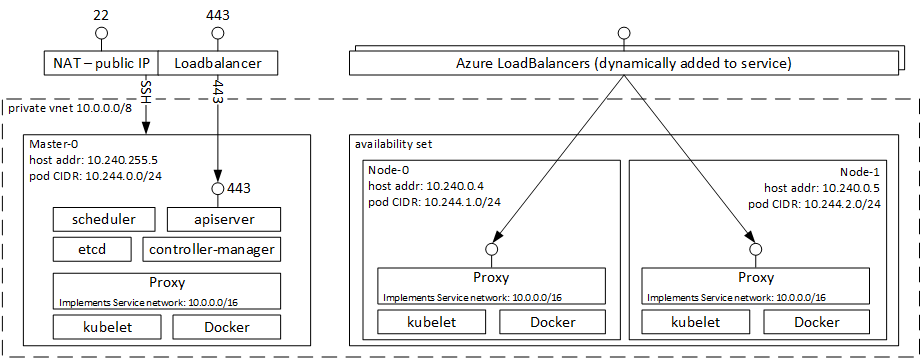
Also the deployed architecture for Kubernetes can be seen in the below diagram.

We will now take a look at the Kubernetes components, you will need kubectl which the Kubernetes command line. If you do not have don’t worry because Azure can get it installed for you with a simple command.
az acs kubernetes install-cli
Now we will need to configure kubectl with the proper credentials to interact with our shiny Kubernetes cluster Again this can be easily achieved using Azure CLI, and interact with the cluster usign kubectl.
$ az acs kubernetes get-credentials -n k8s-cl3 -g acs-k8s-3
$
$ kubectl get nodes
NAME                    STATUS                     AGE       VERSION
k8s-agent-c188e3da-0    Ready                      2d        v1.6.6
k8s-agent-c188e3da-1    Ready                      2d        v1.6.6
k8s-agent-c188e3da-2    Ready                      2d        v1.6.6
k8s-master-c188e3da-0   Ready,SchedulingDisabled   2d        v1.6.6
As you can see currently ACS deploys Kubernetes 1.6.6 by default, if you wish to deploy a different version the best option will be to use ACS-Engine however that will have no support SLA. The ACS team is rolling out a new version of the ACS resource provider that will allow to customize the orchestrator version, use an existing VNET and more great features. However I will leave those two options for a future post.
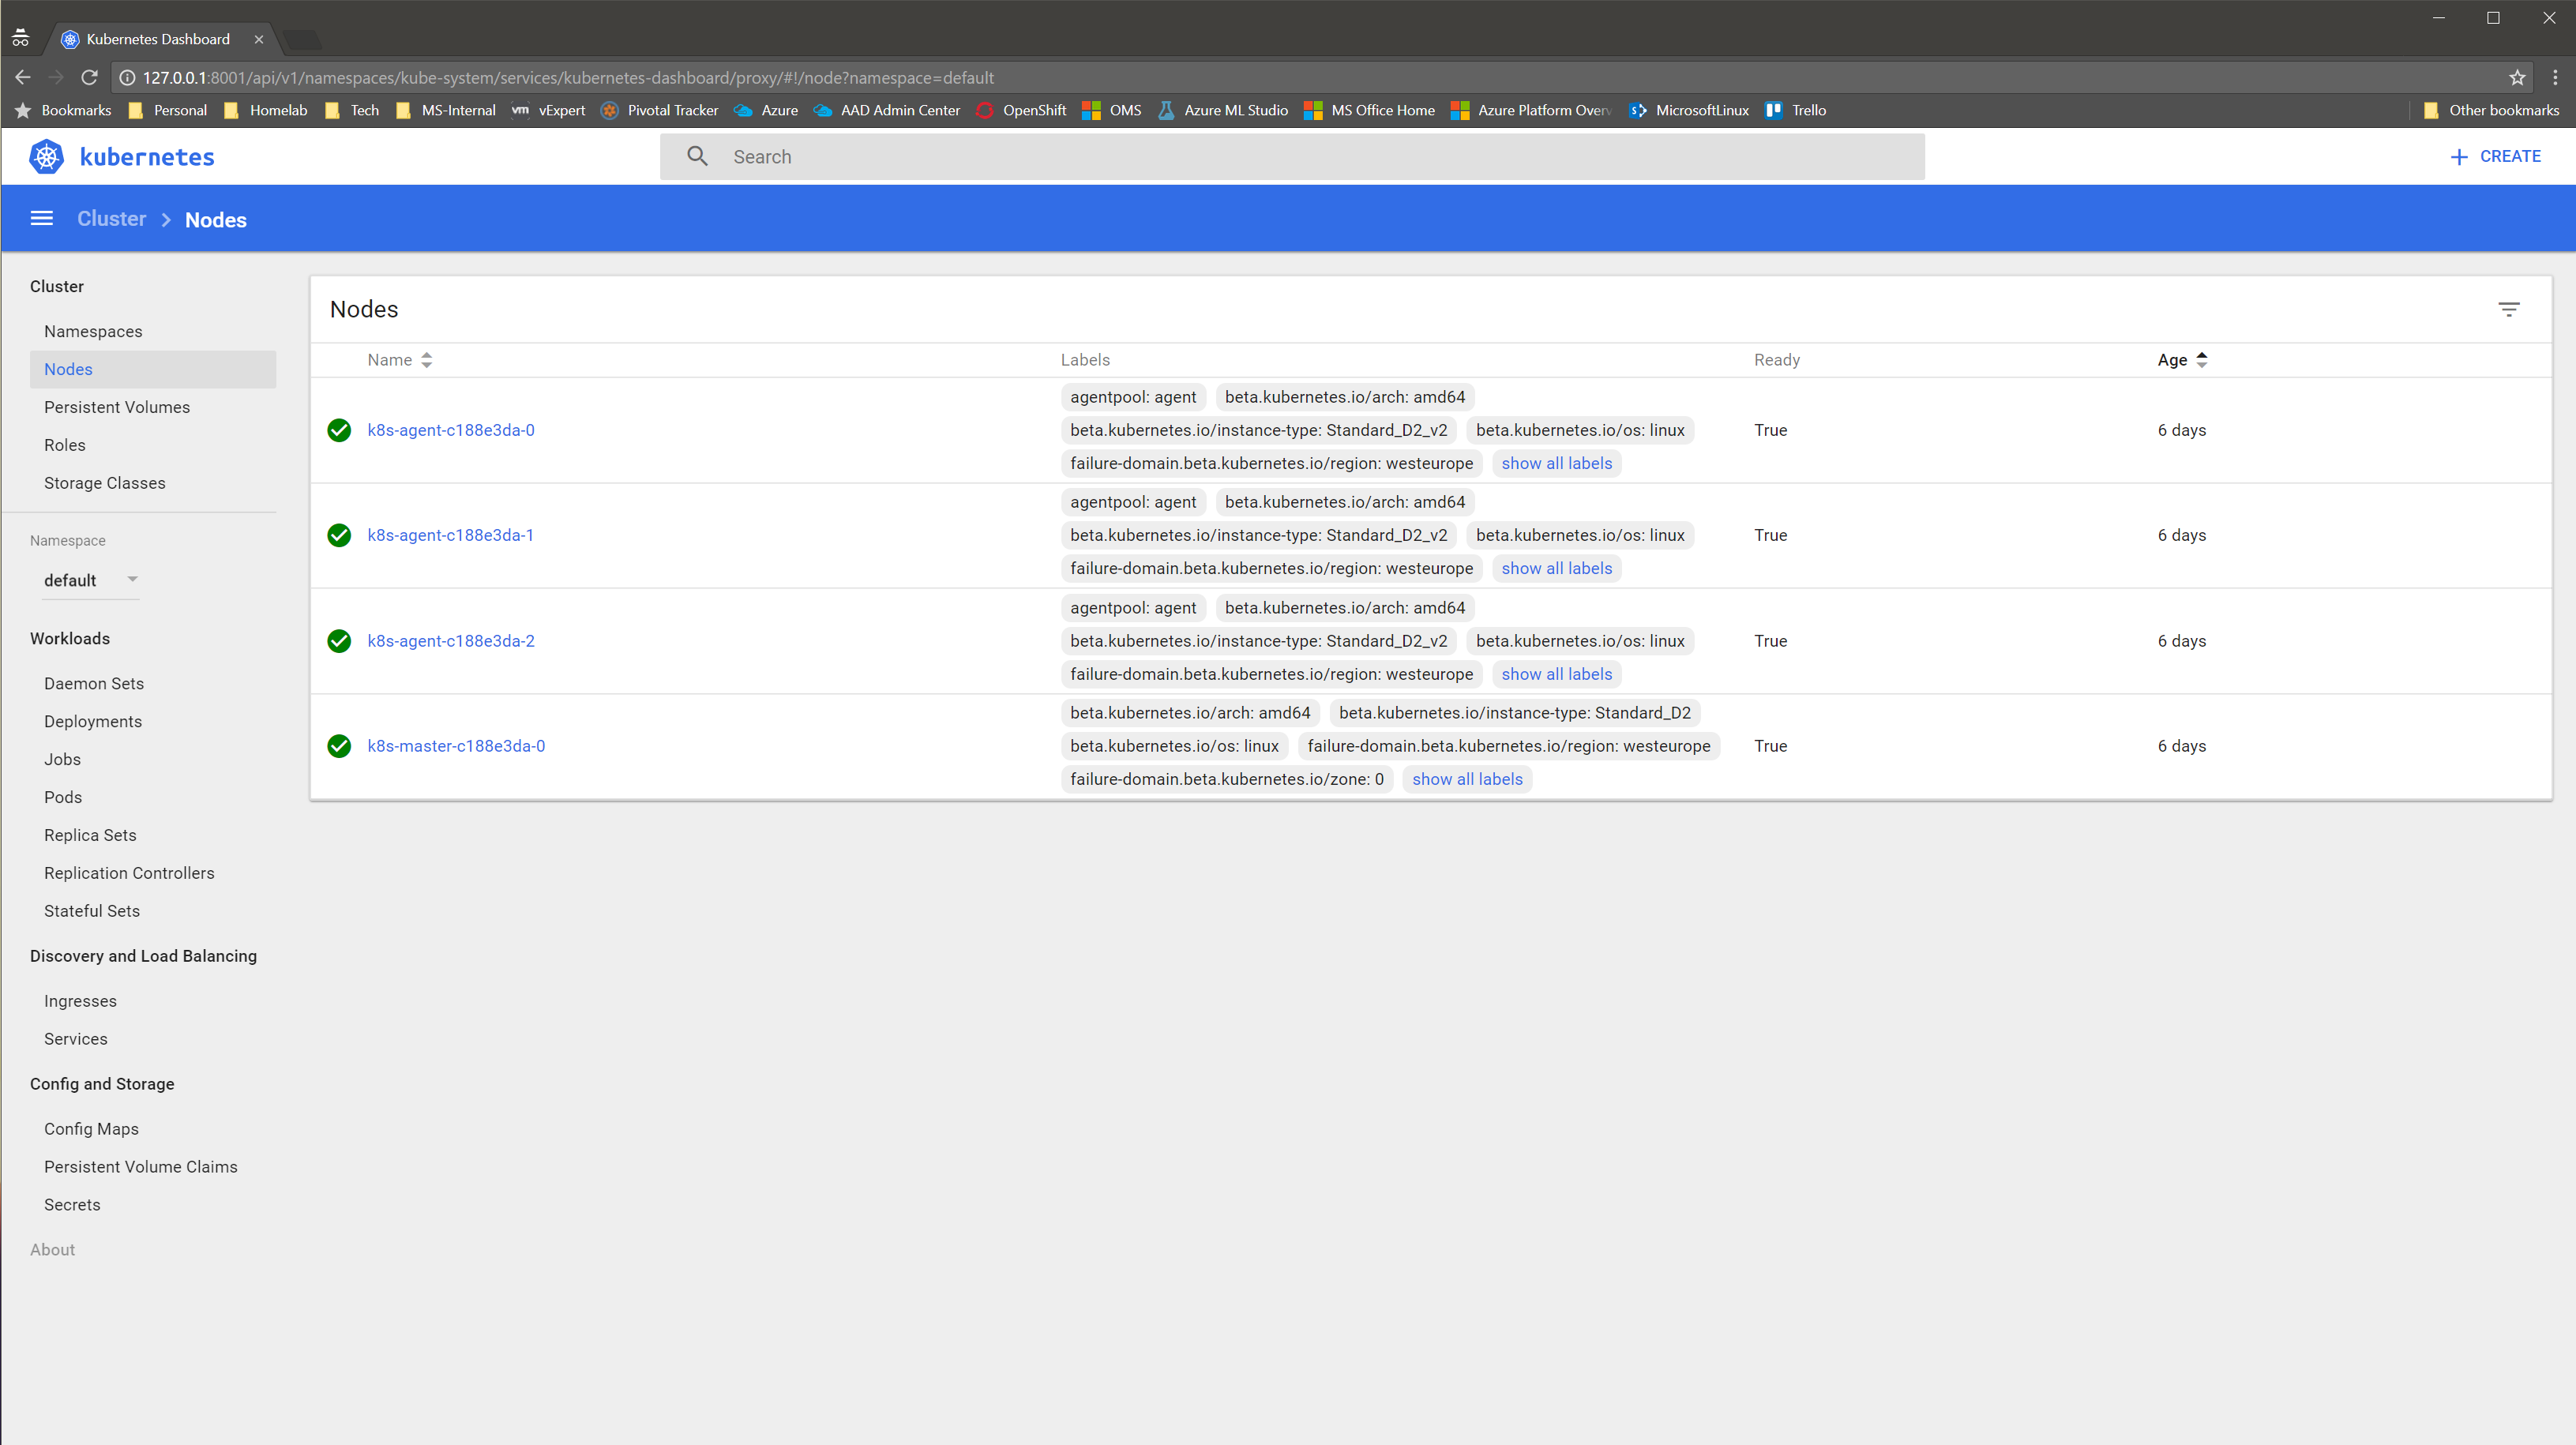
Kubernetes dashboard can also be accessed using kubectl.
$ kubectl proxy
Starting to serve on 127.0.0.1:8001
Point then your favorite browser to http://127.0.0.1:8001/ui and have a look to Kubernetes dashboard.
Networking resources #
On the network side ACS deployed a similar number and type of resources as for DC/OS. With a VNET, NSG, etc.
$ az resource list -g acs-k8s-3 | grep Microsoft.Network
k8s-master-internal-lb-C188E3DA                                  acs-k8s-3        westeurope  Microsoft.Network/loadBalancers
k8s-master-lb-C188E3DA                                           acs-k8s-3        westeurope  Microsoft.Network/loadBalancers
k8s-agent-C188E3DA-nic-0                                         acs-k8s-3        westeurope  Microsoft.Network/networkInterfaces
k8s-agent-C188E3DA-nic-1                                         acs-k8s-3        westeurope  Microsoft.Network/networkInterfaces
k8s-agent-C188E3DA-nic-2                                         acs-k8s-3        westeurope  Microsoft.Network/networkInterfaces
k8s-master-C188E3DA-nic-0                                        acs-k8s-3        westeurope  Microsoft.Network/networkInterfaces
k8s-master-C188E3DA-nsg                                          acs-k8s-3        westeurope  Microsoft.Network/networkSecurityGroups
k8s-master-ip-k8s-cl3-C188E3DA                                   acs-k8s-3        westeurope  Microsoft.Network/publicIPAddresses
k8s-master-C188E3DA-routetable                                   acs-k8s-3        westeurope  Microsoft.Network/routeTables
k8s-vnet-C188E3DA                                                acs-k8s-3        westeurope  Microsoft.Network/virtualNetworks
The main difference is that due to the lack of VMSS the network interfaces of the agents are listed as separate resources and that there is only one Public IP Address resources since the nodes aren’t exposed to the public side unlinke DC/OS public agents.
There are two load balancers, one is exposed to the internet and holds our cluster public IP address. The second one is internal to balance the traffic across the masters.
$ az network lb list -g acs-k8s-3
Location    Name                             ProvisioningState    ResourceGroup    ResourceGuid
----------  -------------------------------  -------------------  ---------------  ------------------------------------
westeurope  k8s-master-internal-lb-C188E3DA  Succeeded            acs-k8s-3        60bbf37f-b796-427e-aacf-512b34932cff
westeurope  k8s-master-lb-C188E3DA           Succeeded            acs-k8s-3        a7fed639-bb33-49f9-9593-c83fbf4c1dfe
Deploy your first application on K8S #
It’s time to deploy our first app on Kubernetes, we will use the example Voting App from the ACS documentation. First clone the repo from Github.
git clone https://github.com/Azure-Samples/azure-voting-app-redis.git
Create the deployment using the YAML manifests from kubernetes-manifests directory.
$ kubectl create -f ./azure-voting-app-redis/kubernetes-manifests/azure-vote-all-in-one-redis.yml
deployment "azure-vote-back" created
service "azure-vote-back" created
deployment "azure-vote-front" created
service "azure-vote-front" created
Two deployments and its corresponding services will be created on our Kubernetes cluster.
$ kubectl get deployment
NAME               DESIRED   CURRENT   UP-TO-DATE   AVAILABLE   AGE
azure-vote-back    1         1         1            0           12s
azure-vote-front   1         1         1            0           11s
$ kubectl get svc
NAME               CLUSTER-IP     EXTERNAL-IP   PORT(S)        AGE
azure-vote-back    10.0.59.147    <none>        6379/TCP       1m
azure-vote-front   10.0.193.196   <pending>     80:31970/TCP   1m
kubernetes         10.0.0.1       <none>        443/TCP        6d
Use kubectl to verify each deployment and its corresponding service.
$ kubectl describe deployment azure-vote-back
Name:                   azure-vote-back
Namespace:              default
CreationTimestamp:      Mon, 04 Sep 2017 20:34:40 +0200
Labels:                 app=azure-vote-back
Annotations:            deployment.kubernetes.io/revision=1
Selector:               app=azure-vote-back
Replicas:               1 desired | 1 updated | 1 total | 1 available | 0 unavailable
StrategyType:           RollingUpdate
MinReadySeconds:        0
RollingUpdateStrategy:  25% max unavailable, 25% max surge
Pod Template:
  Labels:       app=azure-vote-back
  Containers:
   azure-vote-back:
    Image:              redis
    Port:               6379/TCP
    Environment:        <none>
    Mounts:             <none>
  Volumes:              <none>
Conditions:
  Type          Status  Reason
  ----          ------  ------
  Available     True    MinimumReplicasAvailable
  Progressing   True    NewReplicaSetAvailable
OldReplicaSets: <none>
NewReplicaSet:  azure-vote-back-3048739398 (1/1 replicas created)
Events:         <none>
$
$ kubectl describe svc/azure-vote-back
Name:                   azure-vote-back
Namespace:              default
Labels:                 <none>
Annotations:            <none>
Selector:               app=azure-vote-back
Type:                   ClusterIP
IP:                     10.0.59.147
Port:                   <unset> 6379/TCP
Endpoints:              10.244.1.37:6379
Session Affinity:       None
Events:                 <none>
The azure-vote-front service will be exposed to the public and as you can see it is still on <pending> status waiting for a public IP address. This IP address will be assigned by the Azure fabric to a newly created Azure Load Balancer, this is part of the native integration between Kubernetes and Azure.
$ az network lb list -g acs-k8s-3
Location    Name                             ProvisioningState    ResourceGroup    ResourceGuid
----------  -------------------------------  -------------------  ---------------  ------------------------------------
westeurope  k8s-cl3                          Succeeded            acs-k8s-3        f2b26492-0138-4409-81d4-ec7c3c90ad1d
westeurope  k8s-master-internal-lb-C188E3DA  Succeeded            acs-k8s-3        60bbf37f-b796-427e-aacf-512b34932cff
westeurope  k8s-master-lb-C188E3DA           Succeeded            acs-k8s-3        a7fed639-bb33-49f9-9593-c83fbf4c1dfe
The k8s-cl3 load balancer has been created and configured, and after a few minutes azure-vote-front service gets its new public IP address from Azure.
$ kubectl get svc
NAME               CLUSTER-IP     EXTERNAL-IP      PORT(S)        AGE
azure-vote-back    10.0.59.147    <none>           6379/TCP       5m
azure-vote-front   10.0.193.196   52.174.250.179   80:31970/TCP   5m
kubernetes         10.0.0.1       <none>           443/TCP        6d
$ kubectl get pod
NAME                                READY     STATUS    RESTARTS   AGE
azure-vote-back-3048739398-bkwgr    1/1       Running   0          5m
azure-vote-front-3648172574-1znnq   1/1       Running   0          5m
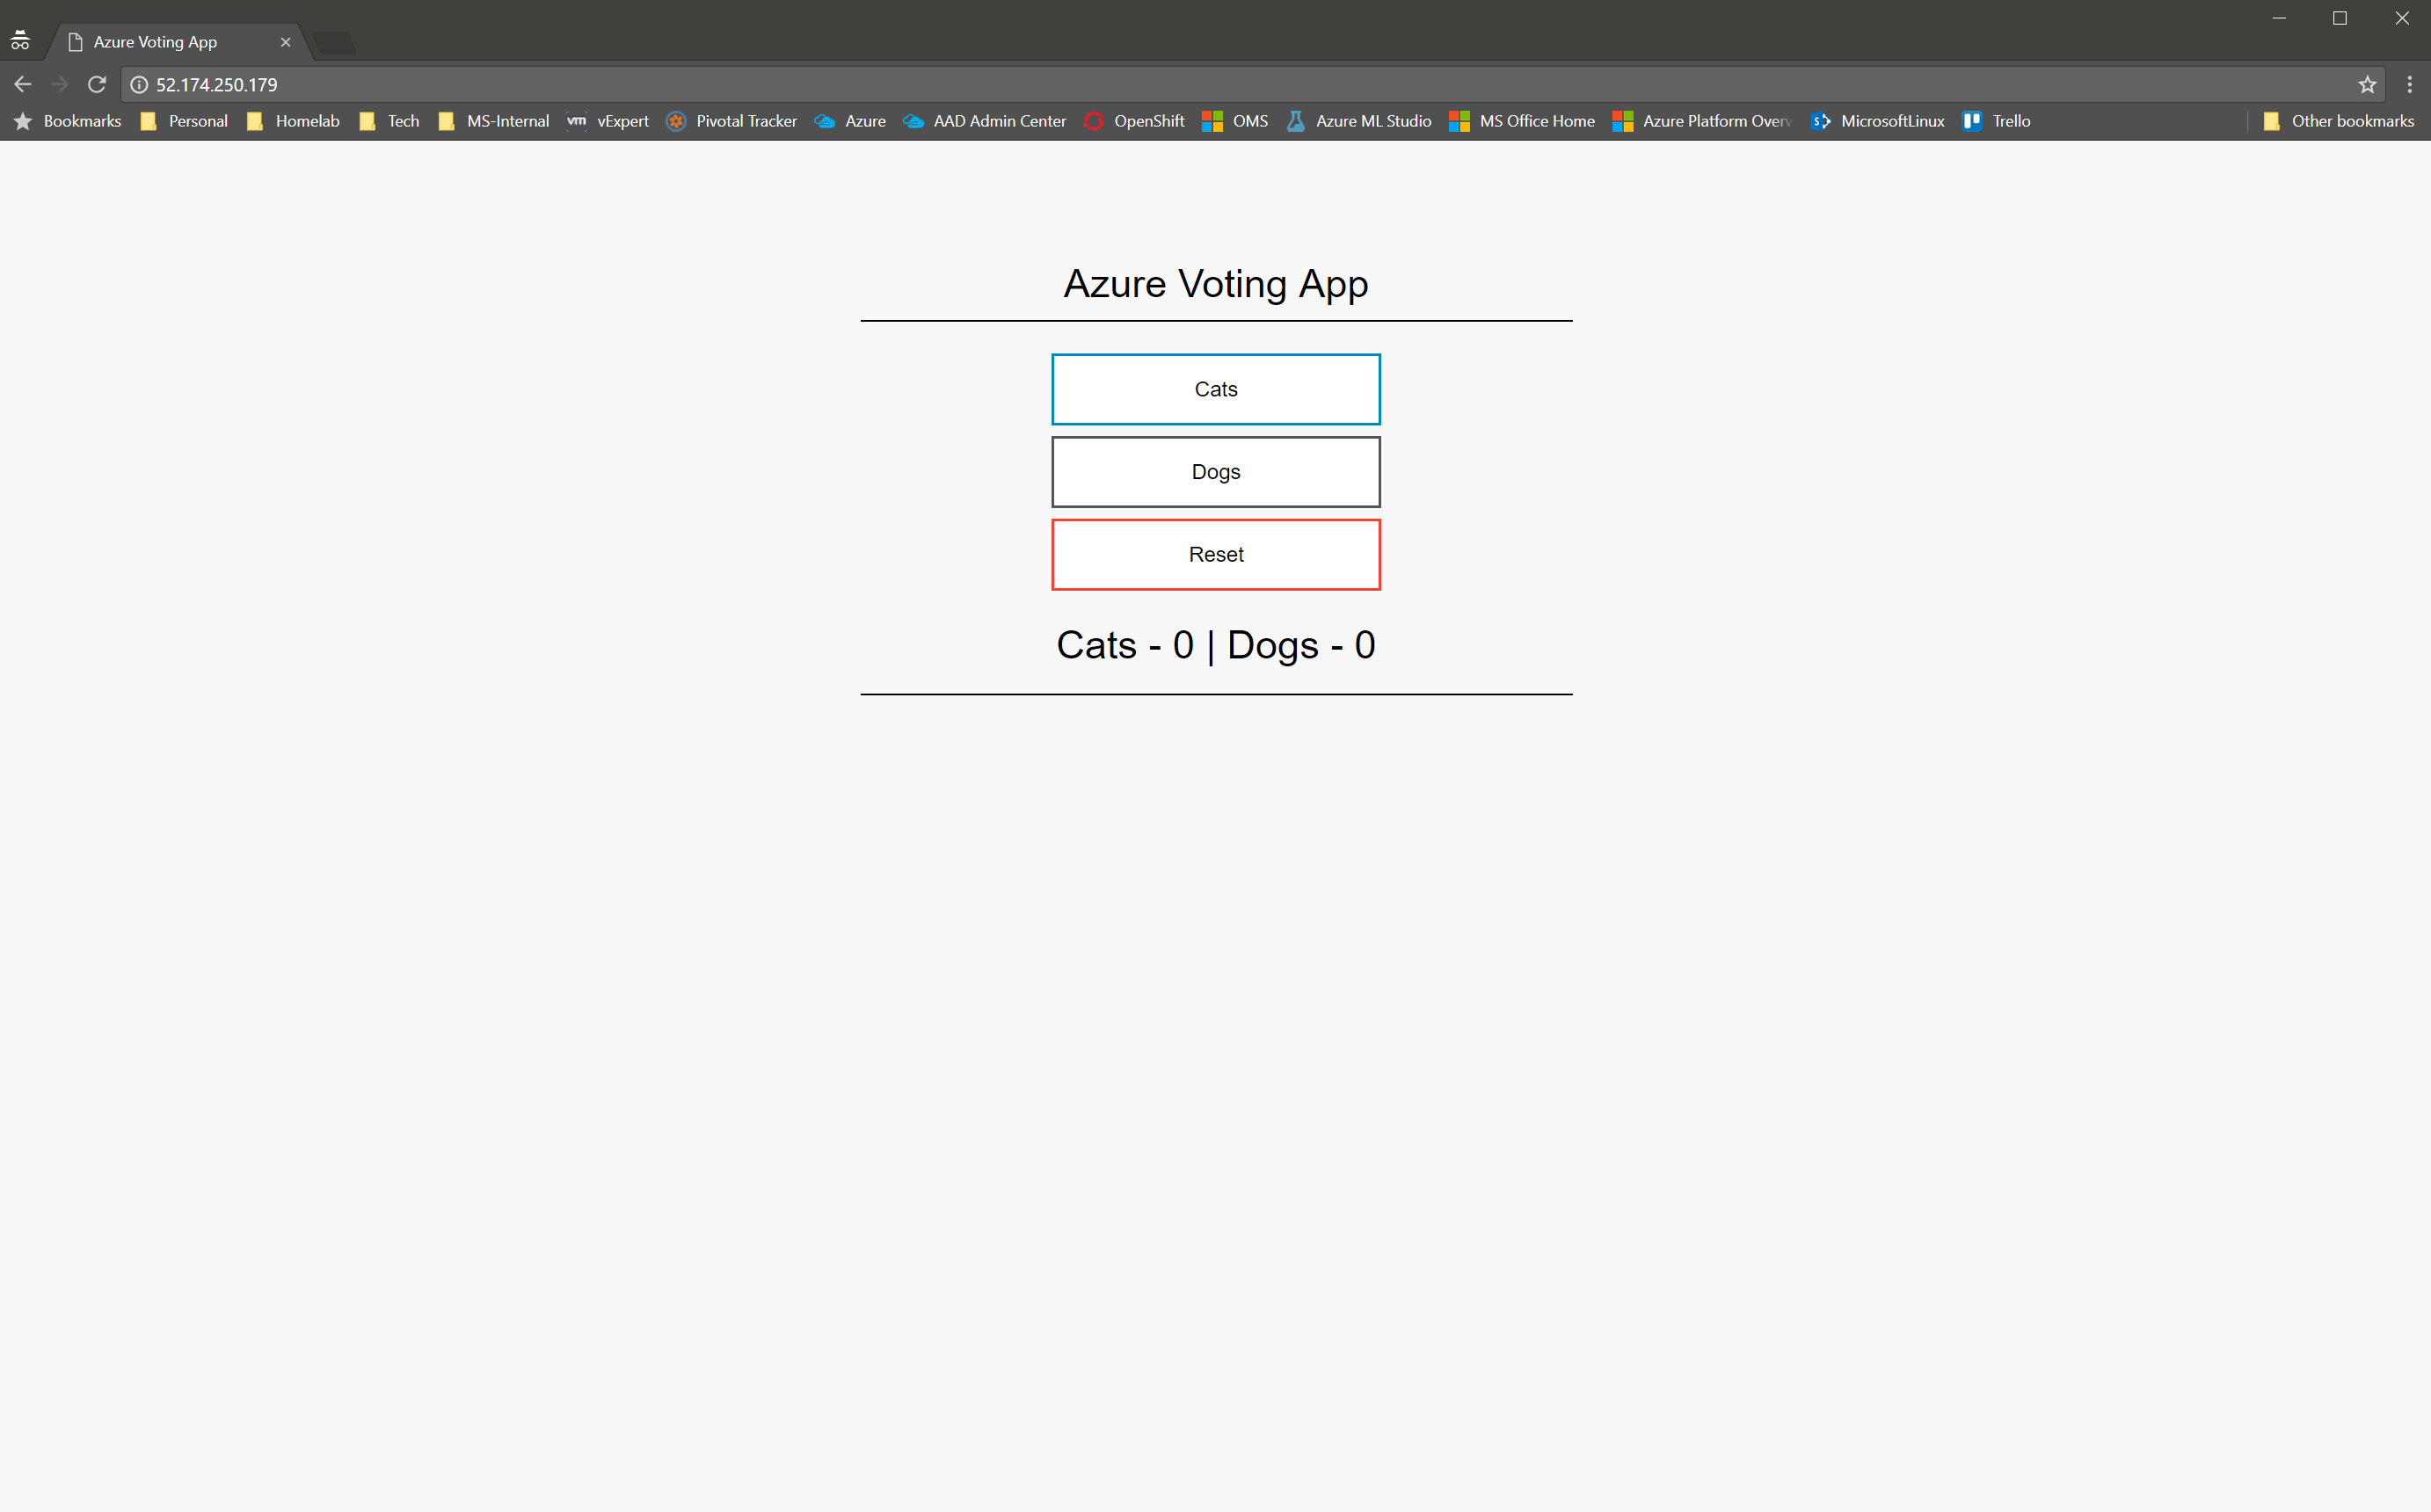
Now access the Voting App using a browser to verify the deployment is working as expected.
Hope all of you find this post or at least part of it helpful and informative, stay tuned for more articles around Kubernetes on Azure.
–Juanma

