Azure DevOps Self-Hosted Agents Deep Dive
Table of Contents
Azure DevOps Pipelines rely on build agents to execute the steps of continuous integration/continuous delivery (CI/CD) pipelines. Microsoft provides Microsoft-hosted agents (running on Azure VMs) for convenience, but sometimes you need more control. This is where self-hosted agents come into play.
In this new article of Azure DevOps Server for homelab automation, we’ll explore what self-hosted agents are, how to set them up on Debian 12 (Linux) and inside a Docker container, and best practices for managing them in both Azure DevOps Services (cloud) and Azure DevOps Server (on-premises).
What is a Self-Hosted Azure DevOps Agent? #
Azure DevOps Agent is a lightweight piece of software that listens for pipeline job requests and executes them. Each agent runs on some compute infrastructure (a VM, physical machine, or container) and can run one job at a time. Azure DevOps offers two main types of agents:
Microsoft-Hosted Agents: Managed by Microsoft in the cloud. Each pipeline run gets a fresh VM with a clean environment, which is discarded after the job completes. These agents come pre-configured with common tools and SDKs.
Self-Hosted Agents: Installed and managed by you on your own machines or containers (Linux, Windows, macOS, or Docker). You have full control over the environment: you can install specific software, use custom hardware, and access private network resources. Unlike Microsoft-hosted agents, self-hosted agents persist between jobs, meaning that caches, files, and installed tools remain on the machine from run to run[. This can improve build speed (by reusing caches) but also means you are responsible for cleaning up or isolating jobs.
Why use self-hosted agents?
- Custom or Legacy Software: You need software or versions not available on Microsoft-hosted agents (for example, a specific library, build tool, or GPU driver). With self-hosted, you install any required dependencies.
- Internal Network Access: Your pipelines must deploy to internal servers or use data that’s behind a firewall. A self-hosted agent can be placed inside your network so it can securely reach those resources (whereas cloud agents might not have access).
- Performance and Control: You can choose a machine with more CPU, memory, or specialized hardware (e.g., GPU, FPGA) for faster builds and tests. You also avoid waiting for a free Microsoft-hosted agent if you have many concurrent jobs.
- Compliance and Security: You may have strict policies requiring build infrastructure to be on-premises or under your control. Self-hosted agents run on your managed infrastructure, which can help satisfy compliance requirements.
Note: Self-hosted agents work with both Azure DevOps Services (the cloud service) and Azure DevOps Server (the on-premises version, formerly TFS). The agent binaries are the same. The primary differences are in how you connect/register the agent (using a different server URL, possibly different authentication) and how updates are managed. We will call out differences where relevant.
Preparing to Set Up a Self-Hosted Agent #
Before diving into installation, ensure you have the following:
- Azure DevOps Access: An Azure DevOps organization (for Services) or a project collection in Azure DevOps Server where you have permission to create agent pools and agents. Usually, you need to be an admin or have sufficient rights to add agents to a pool.
- Agent Pool: A logical container for agents. Azure DevOps has a built-in Default pool, or you can create a new pool (for organization or project isolation). Creating a separate pool for your self-hosted agents is optional but can help organize agents by project or purpose.
- Personal Access Token (PAT): A PAT is typically used for authenticating the agent to Azure DevOps. You will need to generate a PAT with Agent Pools (read, manage) scope in your Azure DevOps organization. In Azure DevOps Server, generate a PAT in your user settings with similar scope at the collection level.
- Machine requirements: For Debian Linux, a 64-bit system is recommended. The agent is a .NET Core application (now targeting .NET 6), but .NET is bundled with the agent, so you don’t need to pre-install the .NET runtime. However, you must have
https://git-scm.cominstalled (version 2.9+), as many pipeline tasks depend on Git. On Debian/Ubuntu, you can ensure this by runningsudo apt-get update && sudo apt-get install -y git. It’s also recommended to update your system packages to avoid missing libraries. - Network Access: The agent will need to reach your Azure DevOps organization/Server URL. For Azure DevOps Services, that means allowing outbound HTTPS to
dev.azure.comand associated endpoints. If your machine is behind a proxy or firewall, configure exceptions for Azure DevOps URLs (and the agent package download domains). If using Azure DevOps Server, ensure the agent machine can reach the server’s URL.
Installing a Self-Hosted Agent on Linux #
Let’s walk through setting up a self-hosted agent on a Linux server. These steps would be similar for all supported Linux distributions (Debian 10+, Ubuntu 18.04+, RHEL 7+, etc., are supported). In my lab I migrated all Linux servers from CentOS and Fedora to Debian so I choose Debian 12.
1. Download the Azure Pipelines Agent Package #
First, obtain the agent software package for Linux:
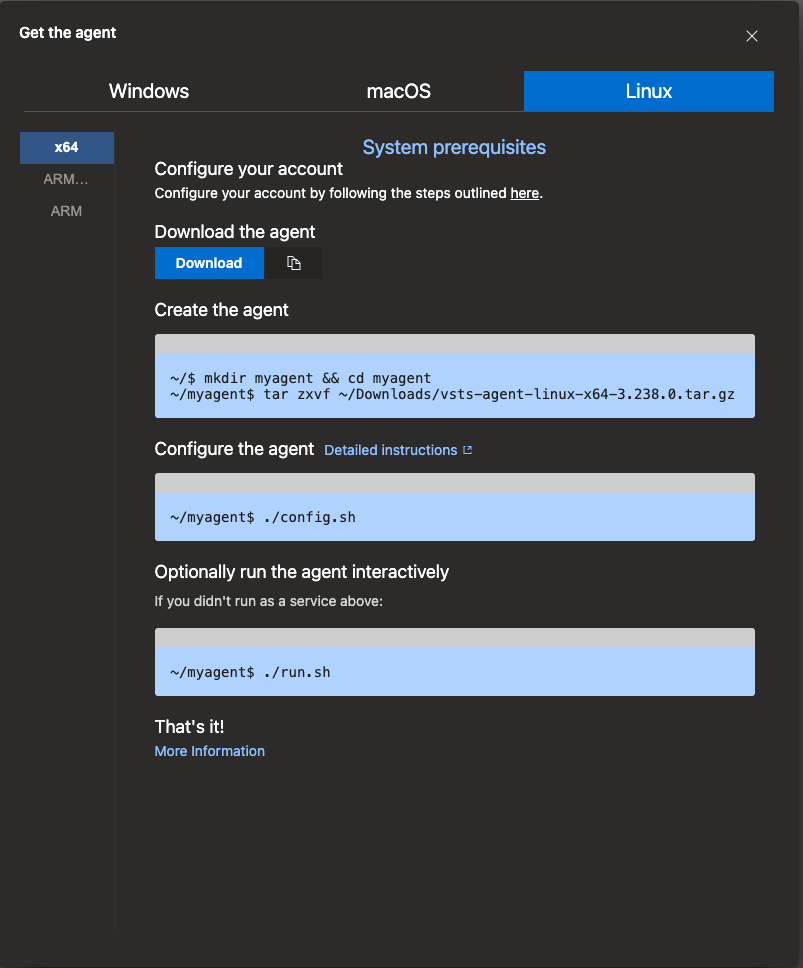
- Via Web UI: Log in to Azure DevOps and navigate to Organization Settings > Agent Pools, or Project Collection Settings > Agent Pools in Azure DevOps Server. Choose your agent pool (e.g., “Default”) and click Add New Agent. In the dialog, select Linux as the OS, then choose the architecture (X64 for a typical PC, or ARM if applicable). You will be given a download link for a
.tar.gzfile. Copy this link or click to download it from your browser. The screenshot below reflects what my homelab Azure DevOps Server, version 2022, gives me to download.
- Via Command Line: On the Linux machine, you can download directly. For example, using
wget:
# Example: download agent v3.x latest for x64 Linux (replace URL with the one from Azure DevOps)
wget https://vstsagentpackage.azureedge.net/agent/3.x.x/vsts-agent-linux-x64-3.x.x.tar.gz -O azure-pipelines-agent.tar.gz
The exact URL will vary with agent version. Azure DevOps Services always offers the latest agent version; Azure DevOps Server may recommend a specific version compatible with the server version, again this reflects my local Azure DevOps Server instance.
Tip: Make a directory for the agent and download into it. For example:
mkdir ~/azure-pipelines-agent && cd ~/azure-pipelines-agent
# ...then download into this directory...
2. Extract the Agent and Install Dependencies #
Once you have the .tar.gz file, extract the archive:
tar -xzf azure-pipelines-agent.tar.gz
This will unpack the agent files into the current directory (e.g., ~/azure-pipelines-agent). Before configuring, ensure required dependencies are in place. As mentioned, Git should be installed. The agent comes with a script to help install any other required libraries:
sudo ./bin/installdependencies.sh
At this point, I ran into my first issue. As of this writing, Debian 12 ships with libicu72, which wasn’t included in the older Azure Pipelines agent dependency script. Here’s the relevant part of the installation output:
adoadmin@ado-agent-01:~/azure-pipelines-agent$ sudo ./bin/installdependencies.sh
[sudo] password for vadmin:
--------OS Information--------
PRETTY_NAME="Debian GNU/Linux 12 (bookworm)"
NAME="Debian GNU/Linux"
VERSION_ID="12"
VERSION="12 (bookworm)"
VERSION_CODENAME=bookworm
ID=debian
HOME_URL="https://www.debian.org/"
SUPPORT_URL="https://www.debian.org/support"
BUG_REPORT_URL="https://bugs.debian.org/"
------------------------------
The current OS is Debian based
--------Debian Version--------
12.11
------------------------------
...
Reading package lists... Done
Building dependency tree... Done
Reading state information... Done
E: Unable to locate package libicu70
E: Unable to locate package libicu67
E: Unable to locate package libicu66
E: Unable to locate package libicu63
E: Unable to locate package libicu60
E: Unable to locate package libicu57
E: Unable to locate package libicu55
E: Unable to locate package libicu52
'apt' failed with exit code '0'
Can't install dotnet core dependencies.
As you can see, the script tries to install several outdated libicu versions that are no longer available in Debian 12 repositories.
To fix this, install the correct version manually:
sudo apt-get install -y libicu72
Once that’s in place, you can proceed with configuring the agent. This issue is known and has been reported in the agent GitHub repo. It will be addressed in a future agent release.
3. Configure the Agent #
To configure the agent run config.sh script. This script will prompt you for several pieces of information to register the agent:
- Server URL: Provide the URL of your Azure DevOps instance.
- For Azure DevOps Services (cloud), it will look like:
https://dev.azure.com/<your_organization> - For Azure DevOps Server (on-premises), use the format:
https://<your_server>/<YourCollection>The script detects whether it’s connecting to DevOps Server or Services based on the URL.
- For Azure DevOps Services (cloud), it will look like:
- Authentication Type: Choose PAT (Personal Access Token). Just press Enter if PAT is the default option. While other authentication methods exist (OAuth device code, service principal, etc.), PAT is the simplest for interactive setups.
- Personal Access Token: Paste the PAT you generated earlier. The token will not be echoed to the screen for security.
Important: Ensure the PAT has the appropriate permissions:
- For Azure DevOps Services:
Agent Pools (Read & Manage)at the Organization scope. - For Azure DevOps Server: Valid for the correct collection, with agent pool management rights.
- For Azure DevOps Services:
- Agent Pool: Enter the name of the agent pool. If you’re using the default pool, press Enter.
- Agent Name: Enter a name for the agent (or press Enter to use the default, typically the machine hostname). If you’re registering multiple agents, use unique, descriptive names like
debian12-agent1,ado-linux-runner, etc. - Work Folder: This is where the agent stores source files, artifacts, and job-related data. Press Enter to accept the default
_work. - TFVC EULA: If you’re using Team Foundation Version Control (TFVC), you will be prompted to accept the Team Explorer Everywhere (TEE) EULA. Type
Yto accept if prompted. Git-based repos do not require this step.
SSL Certificate for Azure DevOps Server (On-Premises)
For Azure DevOps Server, if you’re using HTTPS with a self-signed or internal CA certificate, you’ll need to import the server’s SSL certificate on the agent before running config.sh. Otherwise, the agent will fail to connect.
Steps to import the certificate:
Export the SSL certificate from your Azure DevOps Server.
Transfer the certificate to the agent (e.g., via
scpor shared drive).Convert the certificate to CRT format (if needed):
openssl x509 -inform DER -in ado-server-local.cer -out ado-server-local.crtInstall the certificate on the agent machine:
sudo cp ado-server-local.crt /usr/local/share/ca-certificates/
sudo update-ca-certificates
After importing the certificate, you can proceed with running config.sh.
Example Output: Agent Configuration Process.
./config.sh

  ___                      ______ _            _ _
 / _ \                     | ___ (_)          | (_)
/ /_\ \_____   _ _ __ ___  | |_/ /_ _ __   ___| |_ _ __   ___  ___
|  _  |_  / | | | '__/ _ \ |  __/| | '_ \ / _ \ | | '_ \ / _ \/ __|
| | | |/ /| |_| | | |  __/ | |   | | |_) |  __/ | | | | |  __/\__ \
\_| |_/___|\__,_|_|  \___| \_|   |_| .__/ \___|_|_|_| |_|\___||___/
                                   | |
        agent v3.238.0             |_|          (commit da4a9e9)


>> End User License Agreements:

Building sources from a TFVC repository requires accepting the Team Explorer Everywhere End User License Agreement. This step is not required for building sources from Git repositories.

A copy of the Team Explorer Everywhere license agreement can be found at:
  /home/vadmin/azure-pipeines-agent/license.html

Enter (Y/N) Accept the Team Explorer Everywhere license agreement now? (press enter for N) > Y

>> Connect:

Enter server URL > https://ado-server.starlabs.local/StarLabs
Enter authentication type (press enter for PAT) >
Enter personal access token > ****************************************************
Connecting to server ...

>> Register Agent:

Enter agent pool (press enter for default) >
Enter agent name (press enter for ado-agent-01) >
Scanning for tool capabilities.
Connecting to the server.
Successfully added the agent
Testing agent connection.
Enter work folder (press enter for _work) >
2025-06-11 10:36:42Z: Settings Saved.
4. Run the Agent #
At this point, the agent is configured but not yet running as a background service (unless you pass --start flags for auto-run, which we didn’t in interactive config). The agent can be run in two ways:
A. Run Interactively (for testing): Simply execute the run script in the foreground:
./run.sh
You will see the agent connect to Azure DevOps and wait for jobs. In this mode, the agent will run as long as the terminal session is open. You can stop it with Ctrl+C. This is good for a quick smoke test. If you trigger a build in Azure DevOps, the agent will pick it up and you will see log output streaming in this console.
B. Run as a Service (daemon): For a long-term agent, you’ll want it running continuously in the background, even after reboots. The agent bundle provides a systemd service installer script to set this up:
sudo ./svc.sh install <username>
Replace <username> with the Linux user that should run the agent service. It’s recommended not to run as root. For example, you might have created a user account azureagent for this purpose; if not, you can use your current user name (provided it has rights to the agent files). This command will set up a systemd service unit for the agent.
After installation, start the service:
sudo ./svc.sh start
Input 'vsts.agent.ado-server.Default.ado-agent-01.service' is not an absolute file system path, escaping is likely not going to be reversible.

/etc/systemd/system/vsts.agent.ado\x2dserver.Default.ado\x2dagent\x2d01.service
● vsts.agent.ado\x2dserver.Default.ado\x2dagent\x2d01.service - Azure Pipelines Agent (ado-server.Default.ado-agent-01)
     Loaded: loaded (/etc/systemd/system/vsts.agent.ado\x2dserver.Default.ado\x2dagent\x2d01.service; enabled; preset: enabled)
     Active: active (running) since Wed 2025-06-11 11:14:47 EDT; 17ms ago
   Main PID: 12558 (runsvc.sh)
      Tasks: 2 (limit: 4638)
     Memory: 1.7M
        CPU: 8ms
     CGroup: /system.slice/vsts.agent.ado\x2dserver.Default.ado\x2dagent\x2d01.service
             ├─12558 /bin/bash /home/vadmin/azure-pipeines-agent/runsvc.sh
             └─12561 ./externals/node20_1/bin/node --version

Jun 11 11:14:47 ado-agent-01.starlabs.local systemd[1]: Started vsts.agent.ado\x2dserver.Default.ado\x2dagent\x2d01.service - Azure Pipelines Agent (ado-server.Default.ado-agent-01).
Jun 11 11:14:47 ado-agent-01.starlabs.local runsvc.sh[12558]: .path=/usr/local/bin:/usr/bin:/bin:/usr/local/games:/usr/games
The agent will now run in the background. You can check status with:
sudo ./svc.sh status
Input 'vsts.agent.ado-server.Default.ado-agent-01.service' is not an absolute file system path, escaping is likely not going to be reversible.

/etc/systemd/system/vsts.agent.ado\x2dserver.Default.ado\x2dagent\x2d01.service
● vsts.agent.ado\x2dserver.Default.ado\x2dagent\x2d01.service - Azure Pipelines Agent (ado-server.Default.ado-agent-01)
     Loaded: loaded (/etc/systemd/system/vsts.agent.ado\x2dserver.Default.ado\x2dagent\x2d01.service; enabled; preset: enabled)
     Active: active (running) since Wed 2025-06-11 11:14:47 EDT; 1min 9s ago
   Main PID: 12558 (runsvc.sh)
      Tasks: 22 (limit: 4638)
     Memory: 89.8M
        CPU: 2.859s
     CGroup: /system.slice/vsts.agent.ado\x2dserver.Default.ado\x2dagent\x2d01.service
             ├─12558 /bin/bash /home/vadmin/azure-pipeines-agent/runsvc.sh
             ├─12562 ./externals/node20_1/bin/node ./bin/AgentService.js
             └─12569 /home/vadmin/azure-pipeines-agent/bin/Agent.Listener run --startuptype service

Jun 11 11:14:47 ado-agent-01.starlabs.local systemd[1]: Started vsts.agent.ado\x2dserver.Default.ado\x2dagent\x2d01.service - Azure Pipelines Agent (ado-server.Default.ado-agent-01).
Jun 11 11:14:47 ado-agent-01.starlabs.local runsvc.sh[12558]: .path=/usr/local/bin:/usr/bin:/bin:/usr/local/games:/usr/games
Jun 11 11:14:47 ado-agent-01.starlabs.local runsvc.sh[12561]: v20.11.1
Jun 11 11:14:47 ado-agent-01.starlabs.local runsvc.sh[12562]: Starting Agent listener with startup type: service
Jun 11 11:14:47 ado-agent-01.starlabs.local runsvc.sh[12562]: Started listener process
Jun 11 11:14:47 ado-agent-01.starlabs.local runsvc.sh[12562]: Started running service
Jun 11 11:14:49 ado-agent-01.starlabs.local runsvc.sh[12562]: Scanning for tool capabilities.
Jun 11 11:14:50 ado-agent-01.starlabs.local runsvc.sh[12562]: Connecting to the server.
Jun 11 11:14:51 ado-agent-01.starlabs.local runsvc.sh[12562]: 2025-06-11 15:14:51Z: Listening for Jobs
And to stop it:
sudo ./svc.sh stop
Under the hood, this creates a service (typically named something like vsts.agent.<yourOrg>.<pool>.<agentName>.service). The svc.sh script handles interaction with that service for convenience.
Now your Debian 12 self-hosted agent is installed, configured, and running as a service! It will automatically start on machine boot. In Azure DevOps, the agent shows as online. You can now use it in your pipelines by specifying the agent pool (and optionally demands or capabilities).
Differences for Azure DevOps Server: The process is essentially the same. One key difference is the URL you provide during config (point it to your on-prem server’s collection URL, and if using a self-signed certificate, you might need to trust that on the agent machine). Also, Azure DevOps Server might not auto-update agents as frequently. Check compatibility of agent versions with your server. (Azure DevOps Server 2022 supports the latest 3.x agent releases, whereas older servers might require older agent versions.)
Running a Self-Hosted Agent in Docker #
Another way to host an agent is inside a Docker container. This is especially useful for ephemeral build agents or when using container orchestration (like Kubernetes or Azure Container Instances) to scale agents on demand. You can run a Linux agent in a container on any Docker host (Linux or Windows host), and similarly a Windows container agent on a Windows host.
Below, we detail how to set up an Azure DevOps agent in a Docker container (Ubuntu Linux environment). The general steps are:
- Write a Dockerfile that sets up the environment and agent startup script.
- Build the Docker image.
- Run a container from the image, passing it configuration via environment variables.
1. Create a Dockerfile for the Agent #
Choose a base image. For Linux, we will use an Ubuntu 22.04 base. Microsoft documentation showcase both Alpine and Ubuntu but I personally like Ubuntu since it provide a very base for almost any containerized workload I need.
Create a directory for building the image (e.g., azp-agent-docker), and inside it create a file named Dockerfile (for Ubuntu) with contents like:
# We are using Ubuntu 22.04 as base
FROM ubuntu:22.04

# Set architecture for agent (options: linux-x64, linux-arm, linux-arm64)
ENV TARGETARCH="linux-x64"
ARG TERRAFORM_VERSION="1.12.2"

# Install necessary packages:
RUN apt-get update && \
    apt-get upgrade -y && \
    apt-get install -y --no-install-recommends \
    curl git jq libicu70 unzip ca-certificates && \
    apt-get clean

#Install additional tools

# Install Azure CLI
RUN curl -sL https://aka.ms/InstallAzureCLIDeb | bash

# Install Terraform
RUN curl -fsSL https://releases.hashicorp.com/terraform/${TERRAFORM_VERSION}/terraform_${TERRAFORM_VERSION}_linux_amd64.zip -o terraform.zip && \
    unzip terraform.zip && \
    mv terraform /usr/local/bin/terraform && \
    chmod +x /usr/local/bin/terraform && \
    rm terraform.zip && \
    terraform version

# Create working directory for agent
WORKDIR /azp

# Copy the start script into the image
COPY start.sh .
RUN chmod +x start.sh

# Create a user for the agent (avoids running as root for security)
RUN useradd -m -d /home/agent agent && \
    chown -R agent:agent /azp /home/agent

USER agent

# Entrypoint to execute when container starts
ENTRYPOINT ["./start.sh"]
Let’s break down what this Dockerfile does:
- Base Image: Uses
ubuntu:22.04as the base image. This image does not include the Azure Pipelines agent by default; it will be added in the next steps. - Environment Variable
TARGETARCH: Used to select the correct agent package architecture (e.g.,linux-x64). You can override this for ARM builds if needed. - ARG for Terraform Version: The
TERRAFORM_VERSIONbuild argument allows you to specify which Terraform version to install. - Install Packages: Updates the apt cache and installs essential packages:
curlfor downloading files.gitfor Azure Pipelines tasks that require Git.jqfor JSON parsing (useful in scripts).libicu70to ensure the ICU library is present for .NET 6 on Ubuntu 22.04.unzipandca-certificatesfor extracting and verifying downloads.
- Azure CLI: Installs the Azure CLI using the official Microsoft installation script.
- Terraform: Downloads and installs the specified version of Terraform directly from HashiCorp, verifies, and cleans up after installation.
- Working Directory: Sets
/azpas the working directory where agent files and scripts will reside. - Copy start script: Copies
start.shinto the image and makes it executable. This script will handle agent setup and configuration at container startup. - Create Agent User: Adds a non-root user
agentand sets ownership of relevant directories for improved security. The container runs as this user by default. - Entrypoint: Sets the entrypoint to
start.sh, so the agent setup and run process begins automatically when the container starts.
2. Create the Startup Script (start.sh) #
The start.sh script will handle obtaining the agent and configuring it automatically whenever a container starts. Create a file start.sh in the same folder with contents like:
#!/usr/bin/env bash
set -e

# Helper to print headings
print_header() { echo -e "\n\033[1;36m$1\033[0m\n"; }

# Ensure required env variables are set
if [ -z "$AZP_URL" ]; then
  echo "error: AZP_URL (Azure DevOps Server URL) not set" >&2; exit 1
fi
if [ -z "$AZP_TOKEN" ]; then
  echo "error: AZP_TOKEN (Personal Access Token) not set" >&2; exit 1
fi
if [ -z "$AZP_AGENTPACKAGE_URL" ]; then
  echo "error: AZP_AGENTPACKAGE_URL (Agent package .tar.gz download URL) not set. Get this from your Azure DevOps Server Agent Pools UI." >&2; exit 1
fi

# Prepare token file for agent (so it won't appear in process args)
export AZP_TOKEN_FILE=/azp/.token
echo -n "$AZP_TOKEN" > "$AZP_TOKEN_FILE"
unset AZP_TOKEN  # remove PAT from env

# Create work directory if defined
[ -n "$AZP_WORK" ] && mkdir -p "$AZP_WORK"

# Clean up any existing agent on exit (for reuse or proper deregistration)
cleanup() {
  if [ -e ./config.sh ]; then
    print_header "Cleanup: Removing Azure Pipelines agent..."
    ./config.sh remove --unattended --auth PAT --token "$(cat $AZP_TOKEN_FILE)" || true
  fi
  exit 0
}
trap "cleanup" EXIT

print_header "1. Downloading and extracting agent package"
curl -LsS "$AZP_AGENTPACKAGE_URL" -o agent.tar.gz
tar -xzf agent.tar.gz
rm agent.tar.gz

print_header "2. Configuring agent"
./config.sh --unattended \
  --agent "${AZP_AGENT_NAME:-$(hostname)}" \
  --url "$AZP_URL" \
  --auth PAT --token "$(cat $AZP_TOKEN_FILE)" \
  --pool "${AZP_POOL:-Default}" \
  --work "${AZP_WORK:-_work}" \
  --replace --acceptTeeEula

print_header "3. Running agent"
exec ./run.sh "$@"
Let’s summarize what this script does:
- It checks that
AZP_URL(the Azure DevOps Server collection URL),AZP_TOKEN(Personal Access Token), andAZP_AGENTPACKAGE_URL(the direct download link for the agent .tar.gz from your server’s Agent Pools UI) are provided as environment variables. All are required. - It writes the PAT to a file (
.token) and setsAZP_TOKEN_FILEso the agent can read the token securely, avoiding exposure in process arguments. - It sets up a
cleanup()function that will remove the agent registration if the container is shutting down. This is important for ephemeral agents: it ensures that when the container exits, the agent is unregistered from Azure DevOps so it doesn’t appear as an “offline” agent in your pool. - It traps exit signals to call cleanup (so if the container is stopped, it runs the removal).
- It downloads the agent package from the URL you provided (
AZP_AGENTPACKAGE_URL), extracts it, and removes the archive. - It runs
config.shin unattended mode with the supplied details:--agentname (uses container hostname orAZP_AGENT_NAMEoverride).--urlwithAZP_URL.- Auth PAT with token from file.
--pool(defaults to Default or usesAZP_POOLvariable if set).--workdirectory (defaults to_workor usesAZP_WORK).--replace(if an agent with the same name exists, replace it).--acceptTeeEulato auto-accept the TFS EULA for TFVC (non-interactive).
- Finally, it executes
run.shto start the agent, usingexecso that it takes over the container process. The"$@"allows additional arguments to be passed when the container starts (for example, you could pass--oncehere viadocker run).
Important: In the Dockerfile, we set the entrypoint to start.sh. This means when we run the container, by default it runs the agent immediately with this script.
3. Build the Docker Image #
With the Dockerfile and start.sh in the same directory, build the image:
docker build -t azure-pipelines-agent:linux .
This will produce a Docker image named azure-pipelines-agent:linux (you can name/tag as you like). The build process will download packages and set up everything as described.
4. Run the Agent Container #
Now you can create container instances of this image. To run one agent container, use:
docker run -e AZP_URL="https://ado-server.local/DefaultCollection" \
  -e AZP_TOKEN="your_pat_here" \
  -e AZP_AGENT_NAME="homelab-docker-agent" \
  -e AZP_AGENT_POOL="Default" \
  --name ado-agent \
  azure-pipelines-agent:linux
Let’s break down those options:
- We run in detached mode (
-d) to start the container in the background. You can omit-dif you want to see logs in the foreground. -eflags set environment variables inside the container:AZP_URL: The Azure DevOps Server collection URL (e.g.,https://ado-server.local/DefaultCollection).AZP_TOKEN: The Personal Access Token (PAT) for agent authentication. (Use a limited-scope PAT and rotate as needed.)AZP_POOL: The name of the agent pool to register into (e.g., “Default”).AZP_AGENT_NAME: The desired agent name. If not set, the script uses the container’s hostname by default.AZP_WORK: The work directory inside the container for pipeline execution (defaults to_workif not set).AZP_AGENTPACKAGE_URL: The direct download URL for the agent package.tar.gzfile from your Azure DevOps Server Agent Pools UI (required for Azure DevOps Server scenarios).
--nameassigns a friendly name to the container (optional).- The last argument specifies the image to run (e.g.,
azure-pipelines-agent:linux).
The container will startup, and our start.sh will configure the agent and connect it. Within a minute, you should see a new agent appear in your Azure DevOps agent pool (with the given name). It will be ready to run jobs.
Stopping and Removing: If you stop the container (docker stop my-azure-agent), the cleanup() in the script will remove the agent registration from Azure DevOps before the container fully exits. If you then remove the container (docker rm my-azure-agent), you’re cleaning up that agent instance entirely.
Scale-out: You can run multiple containers (just give each a unique AZP_AGENT_NAME or let it default). Each will register as an independent agent. This is one way to scale out agents on a single Docker host or across a cluster.
Ephemeral agents: If you want each job to run on a new container (so that the environment is always clean), you can run the agent with the --once flag. One way to do this is add --once at the end of the docker run command:
docker run --rm -e AZP_URL="..." -e AZP_TOKEN="..." ... azure-pipelines-agent:linux --once
With --once, the agent will accept only one job and then shut itself down. The container will then exit (especially if --rm was used, it will remove itself). In this mode, you’ll typically rely on an external orchestrator (like Azure Container Instances, Kubernetes, or a script) to launch a new container whenever there’s a new job to run. This provides maximum isolation per pipeline run.
Using Docker-in-Docker: If your pipeline tasks themselves need to run Docker (for example, building container images inside the pipeline on a Linux agent container), you can enable “Docker-in-Docker” by bind-mounting the host’s Docker socket into the container (e.g., -v /var/run/docker.sock:/var/run/docker.sock). Use caution: this gives the pipeline tasks root access to the Docker host, which is a security risk. Consider this only in fully trusted scenarios.
Using and Managing Self-Hosted Agents #
Once your agents (whether on a VM or in Docker) are up and running, here are key points on how to use and manage them:
Agent Pools: Your self-hosted agents reside in an agent pool (Default or a custom pool you created). You can share a pool across projects (Azure DevOps Services) or collections (Azure DevOps Server). In a pool, you might have multiple agents (for parallel jobs). Manage pools under Organization Settings > Agent Pools (or Collection Settings > Agent Pools on Azure DevOps Server). You can see each agent’s status (online/offline), last job run, and system capabilities (the agent auto-detects certain capabilities like OS, installed software, etc.).
Selecting Agents in Pipelines: To use a self-hosted agent, edit your pipeline definition (YAML or classic) to use the agent pool you deployed to. For YAML pipelines, set
pool: <YourPoolName>at the job or pipeline level. For classic pipelines, select the agent pool in the pipeline settings. If you have a single agent in the pool, the job will target it. If multiple, any agent in the pool can pick up jobs (unless you specify demands to match certain capabilities).Capabilities and Demands: Agents report capabilities (like
Agent.OS= Linux, or software versions if you add custom capabilities). You can also manually add user capabilities to an agent (in Azure DevOps UI, select the agent and add a name-value pair). Pipeline jobs can declare demands that must be met by an agent’s capabilities. This is useful if only some agents have a particular tool installed. For example, if an agent has a capabilityDocker=true, a pipeline can demandDockerto ensure it runs on an agent that has Docker available.Agent Status and Maintenance: If you need to take an agent offline (for example, to restart the machine or update it), you can disable it in the Azure DevOps pool UI (there is a “Disable” or “Pause” button for each agent). This prevents new jobs from being assigned to it. Agents also have an auto-update feature: by default, Azure DevOps Services will update the agent software on your machine when a new version is available (this usually happens when a pipeline runs on that agent and detects an outdated version). For Azure DevOps Server, updates are less frequent and tied to server updates; you might need to manually upgrade agents when you upgrade the server.
Logs: Agent logs are available on the machine (in the agent’s
_diagfolder). If a pipeline job fails in a way that seems related to the agent (e.g., cannot connect, capability missing), check the_diaglogs for errors. The Azure DevOps UI also shows pipeline logs, but agent-specific issues (like service connectivity or config errors) will be in those local logs.Updating Configuration: If you need to reconfigure an agent (to point to a different project collection or pool), you should first remove it: run
./config.sh removeon the machine, or use the Docker cleanup as shown. Then you can re-runconfig.shto add it elsewhere. Alternatively, you can runconfig.sh --unattendedwith new parameters to reconfigure (the--replaceflag we used in Docker essentially does this).
Best Practices and Troubleshooting #
Using self-hosted agents gives flexibility but also responsibility. Here are some best practices and common troubleshooting tips:
1. Security Best Practices #
Least Privilege: Run the agent with a low-privileged account. On Linux, this means do not run as root. On Windows, use a service account with limited permissions. The agent should not be running with domain admin or highly elevated rights. This minimizes the impact if pipeline code (which could be from many team members or open source) does something malicious. For example, if using Azure DevOps Server with Azure AD, avoid running agents with an identity that has broad access to Azure DevOps itself or other critical systems.
Isolate Agents by Purpose/Project: If possible, use separate agent pools (and even separate machines) for different projects or environments. This prevents a pipeline in Project A from potentially affecting the agent that will run a job for Project B (through leftover files or malicious alterations). It also helps limit the blast radius if a credential is compromised.
Firewall and Network: Restrict the agent machine’s inbound access if it doesn’t need to accept external connections. It only needs to initiate outbound connections to Azure DevOps (Services or Server). Ensure required URLs are reachable; for Azure DevOps Services, allow
dev.azure.comand the agent communication endpoints. If behind a proxy, setHTTP_PROXY/HTTPS_PROXYenvironment variables for the agent service so it knows how to connect out.Secrets Management: Do not hardcode secrets (like PATs) into scripts or images. In the Docker scenario, using environment variables or Azure Key Vault integration for retrieving secrets is better. Also, prefer Azure Pipelines secret variables or service connections to manage sensitive info rather than baking them into the agent machine. If you used a PAT to configure the agent, treat that PAT like a password: rotate it periodically (you can update the agent by reconfiguring with a new PAT when the old one expires).
Maintenance: Keep the OS and software on the agent machine updated (apply security patches, update build tools etc.). The agent will update itself automatically for minor version bumps (especially on Azure DevOps Services), but you handle the rest of the environment.
2. Performance and Reliability #
One Agent = One Job: Avoid running multiple agent instances on the same machine concurrently. While it’s technically possible to install two agents pointing to different pools on one machine, they will compete for CPU/RAM and disk, often making things slower or unpredictable. It’s usually more efficient to run one agent per machine (or container) and scale out by adding more machines/containers to the pool if you need parallelism.
Use Self-Hosted for Long or Specialized Jobs: Microsoft-hosted agents have a time limit (currently about 60 minutes for public projects by default, and up to 6 hours for private depending on Azure DevOps settings). Self-hosted agents can run longer jobs since you control them. If you have builds that take hours, a self-hosted agent might be necessary.
Cleaning Up Artifacts: Since self-hosted agents are re-used, the working directory (
_work) accumulates files over time (sources, artifacts, etc.). This can consume a lot of disk space and even affect build correctness if not cleaned occasionally. Consider enabling pipeline options like “Clean” (in YAML,clean: trueon checkout step) to wipe sources each run, or set up a scheduled task/pipeline to clean the agent work folders periodically. You could also use the built-inhttps://learn.microsoft.com/en-us/azure/devops/pipelines/agents/agent-pool-maintenancein Azure DevOps for on-prem agents.Monitor Agent Health: Azure DevOps UI will show if an agent is offline or erroring. Ensure your agent machines have monitoring on CPU, memory, and disk—so you know if an agent is overloaded. If builds start to queue up, consider adding more agents to the pool to handle the load.
3. Troubleshooting Common Issues #
Agent Not Showing Up/Connecting: If after configuration the agent doesn’t appear online, check the console output or logs:
- Was the PAT valid and did it have the right scope? (If not, the config script might fail authentication).
- Did you accidentally run
config.shas root but then run the agent as a different user without proper file permissions? (This can cause the agent to fail to read its settings. Ensure the user running the agent owns the files.) - Networking: Does the machine have internet access to Azure DevOps? If through a proxy, you may need to configure proxy settings. You can set environment variables
AZP_AGENT_HTTP_PROXYandAZP_AGENT_HTTPS_PROXYfor the agent, or configure system proxy. Also verify DNS (the agent needs to resolve dev.azure.com). - For Azure DevOps Server, ensure the URL and collection name are correct. If using NTLM/Integrated auth (instead of PAT), you might need to run the agent as a domain user that has access, or better, use PAT/Alternate Credentials.
Agent Goes Offline Unexpectedly: Check if the process crashed – look at the
_diaglogs for exceptions. Common causes: machine rebooted, network dropped, or an unhandled pipeline task exception. The agent will usually reconnect if network blips. If it crashed, you might see an error in the event logs (Windows) or systemd journal (Linux). Make sure the service is set to auto-restart (the systemd service should restart by default on failure). Also verify that your PAT hasn’t expired (the agent will show as offline if the auth token is no longer valid).Pipeline Job Fails Due to Missing Tools: If a job fails on a self-hosted agent but works on a Microsoft-hosted agent, it could be because the hosted agent image had a tool pre-installed that your self-hosted agent lacks. Check the error logs to see what’s missing (e.g., “command not found” or similar). Then install that tool on your agent machine and restart the agent so it updates its capabilities. For example, you might need to install Node.js, Python, Java, or other frameworks if your builds require them.
Docker Container Agent Issues: If your containerized agent isn’t connecting:
- Ensure the environment variables (AZP_URL, AZP_TOKEN, etc.) are correctly passed. A simple mistake like a typo or forgetting to include
-e AZP_TOKEN=...will cause the startup script to exit. - Attach to container logs (
docker logs -f <container>) to watch the startup process for errors. - If using service principal auth, ensure Azure CLI in the image and credentials are correct.
- If builds inside the container need certain tools, you might need to extend the Dockerfile and rebuild the image.
- Remember, if you use
--once, the container will exit after one job by design. To continuously accept jobs, do not use--once(or always relaunch containers).
- Ensure the environment variables (AZP_URL, AZP_TOKEN, etc.) are correctly passed. A simple mistake like a typo or forgetting to include
Auto-Upgrades and Compatibility: Occasionally, Microsoft releases a new agent version. Self-hosted agents connected to Azure DevOps Services will usually self-update when they pick up a job (they download the new agent internally). If an update fails (network or permissions issue), the agent might drop offline. You can manually update by re-downloading the latest agent package and reconfiguring. For Azure DevOps Server, make sure you use the supported agent version. If the server is older, check the docs – using an agent that’s too new might not work with an old server (in such cases, download an older agent from the Microsoft agent archive that matches your server version).
Self-hosted agents in Azure DevOps give you the flexibility to tailor your build and deployment environment to your needs. Whether it’s running an agent on a Debian 12 server with custom tools, or containerizing agents for on-demand scalability, the process boils down to installing the agent software and registering it with your Azure DevOps project. We covered how to set up a Linux agent on Debian, how to run an agent in Docker, and best practices to keep your agents secure and efficient.
By leveraging self-hosted agents, you gain greater control at the cost of managing the infrastructure. Always weigh the trade-offs: if the hosted agents meet your needs, they might be easier to use and more secure (clean VMs per run). But for many scenarios—especially with specialized requirements—self-hosted agents are the way to go, enabling powerful CI/CD pipelines that integrate tightly with your technology stack and network environment.
Please leave your comments and questions here or reach out on Twitter, Bluesky or LinkedIn.
Thanks!
–Juanma